

localhost). The TypingMind steps are the same; only the Server URL and which connector you pick change.
The AI doesn’t only build workflows. You can also run your n8n workflows right from a TypingMind chat and get the results back in the chat. See Run a workflow from chat.
This guide walks through two real examples:
- Build a support ticket workflow by chatting. It sorts incoming tickets by priority and category, saves them, replies to the sender, and sends a digest every day at 5 PM.
- Turn a workflow into AI tools. It’s a mini CRM that you can talk to: “Add Jane from Acme”, “Who’s still new?”
This guide was tested with n8n 2.46.4 (self-hosted), TypingMind MCP Connector 1.4.1, and Claude Haiku 5.5 on November 4–5, 2026. n8n’s built-in MCP server is free in all n8n editions, including self-hosted Community Edition.
Ways to connect n8n
There are three ways to connect n8n to TypingMind. You can use more than one at the same time.Requirements
- An n8n instance in any of these forms:
- n8n Cloud
- Self-hosted n8n with a public HTTPS URL
- Local n8n on
localhost(or another private address)
- You need to be the owner or an admin to turn on MCP access.
- An AI model that supports plugins/tool calling. Claude Haiku 5.5 handled every step in this guide.
- Connector:
- n8n Cloud or public HTTPS: TypingMind Cloud is enough. You don’t need the Private MCP Connector.
- Local / private network: the Private MCP Connector running on a computer that can reach n8n, usually the same computer.
Part 1: Connect n8n to TypingMind
Pick the tab that matches your n8n. n8n Cloud or a public HTTPS URL is the simpler path — TypingMind Cloud talks to n8n directly, and you don’t need the Private MCP Connector. Use the localhost tab if n8n runs on your computer.- n8n Cloud or public HTTPS URL
- n8n on your computer (localhost)
1
Turn on MCP access in n8n
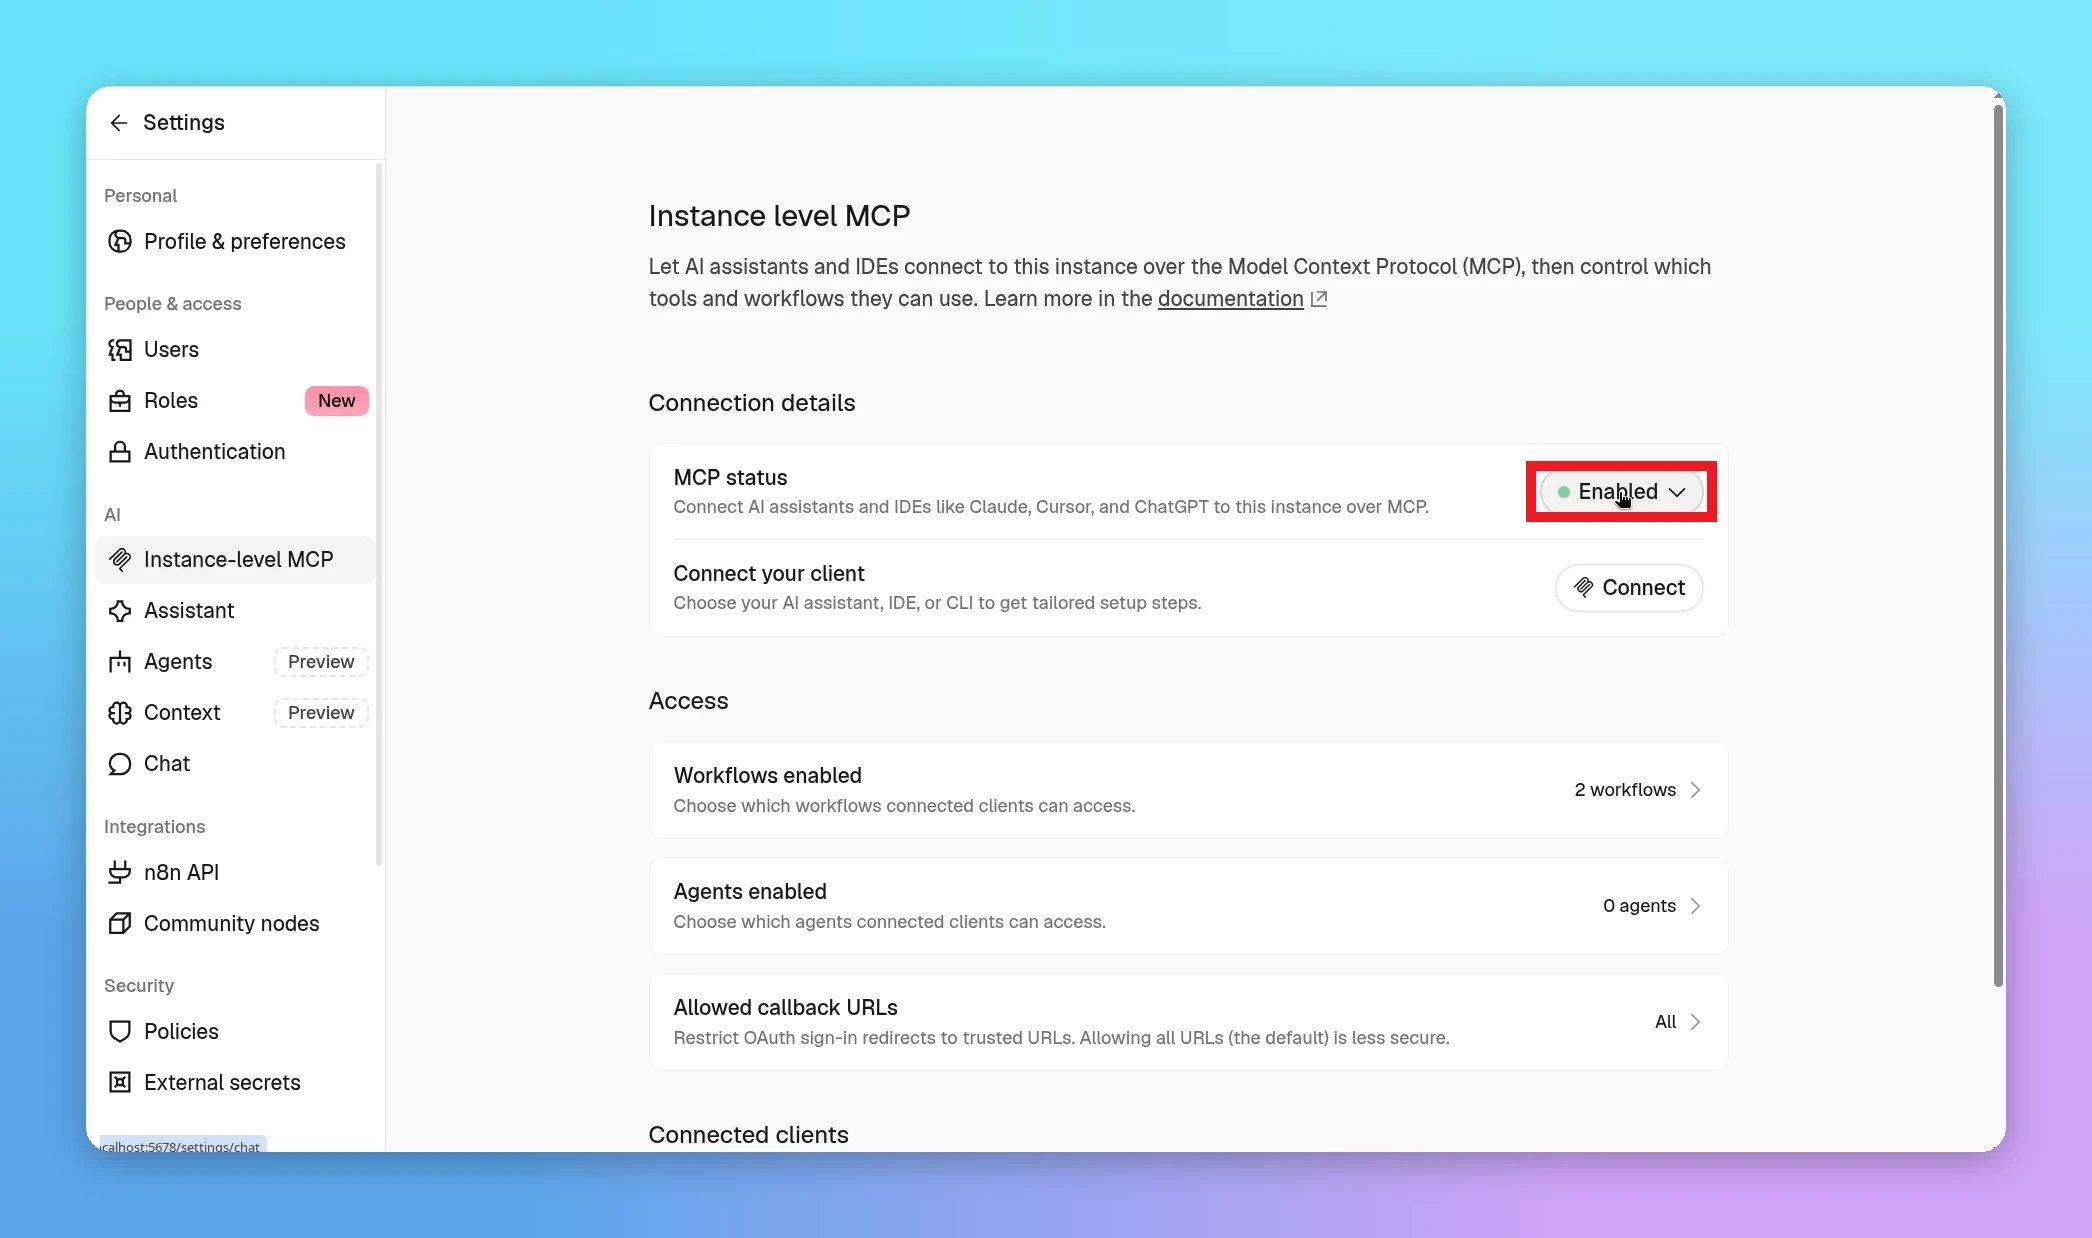
- In n8n, click Settings (bottom left) and choose Instance-level MCP.
- Under Connection details, check that MCP status says Enabled. If it doesn’t, open the menu and enable it.
-
Under Access, Workflows enabled shows which workflows MCP clients can use (for example, 2 workflows).
2
Copy the Server URL and access token
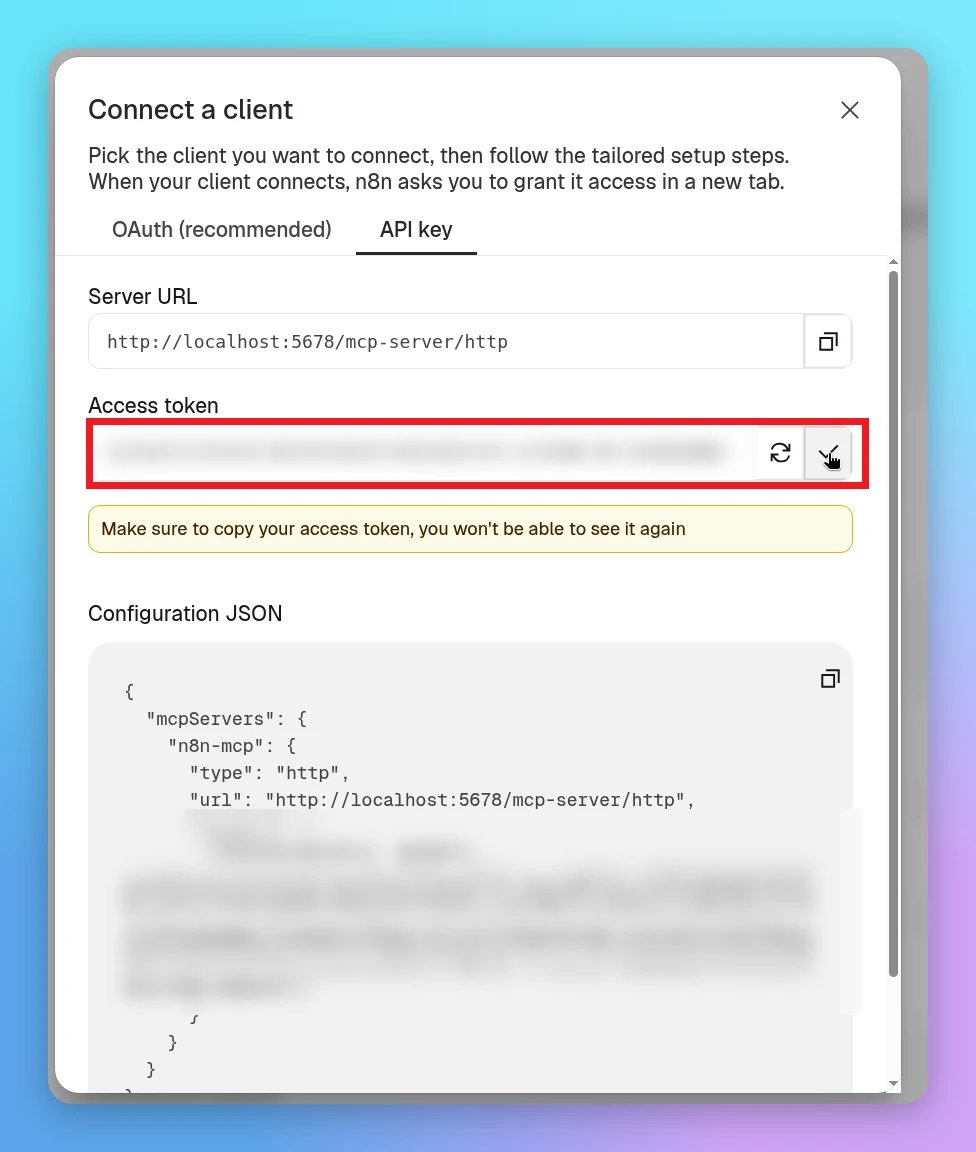
- Next to Connect your client, click Connect.
- In the Connect a client dialog, open the API key tab.
-
Copy the Server URL. On n8n Cloud it looks like
https://<your-instance>.app.n8n.cloud/mcp-server/http. On self-hosted n8n with a public domain, it looks likehttps://<your-domain>/mcp-server/http. The URL must use https and end with/mcp-server/http. -
Next to Access token, click the refresh icon to create a token (or copy the one you already generated), then click the copy icon next to it.
3
Add n8n as an MCP server in TypingMind
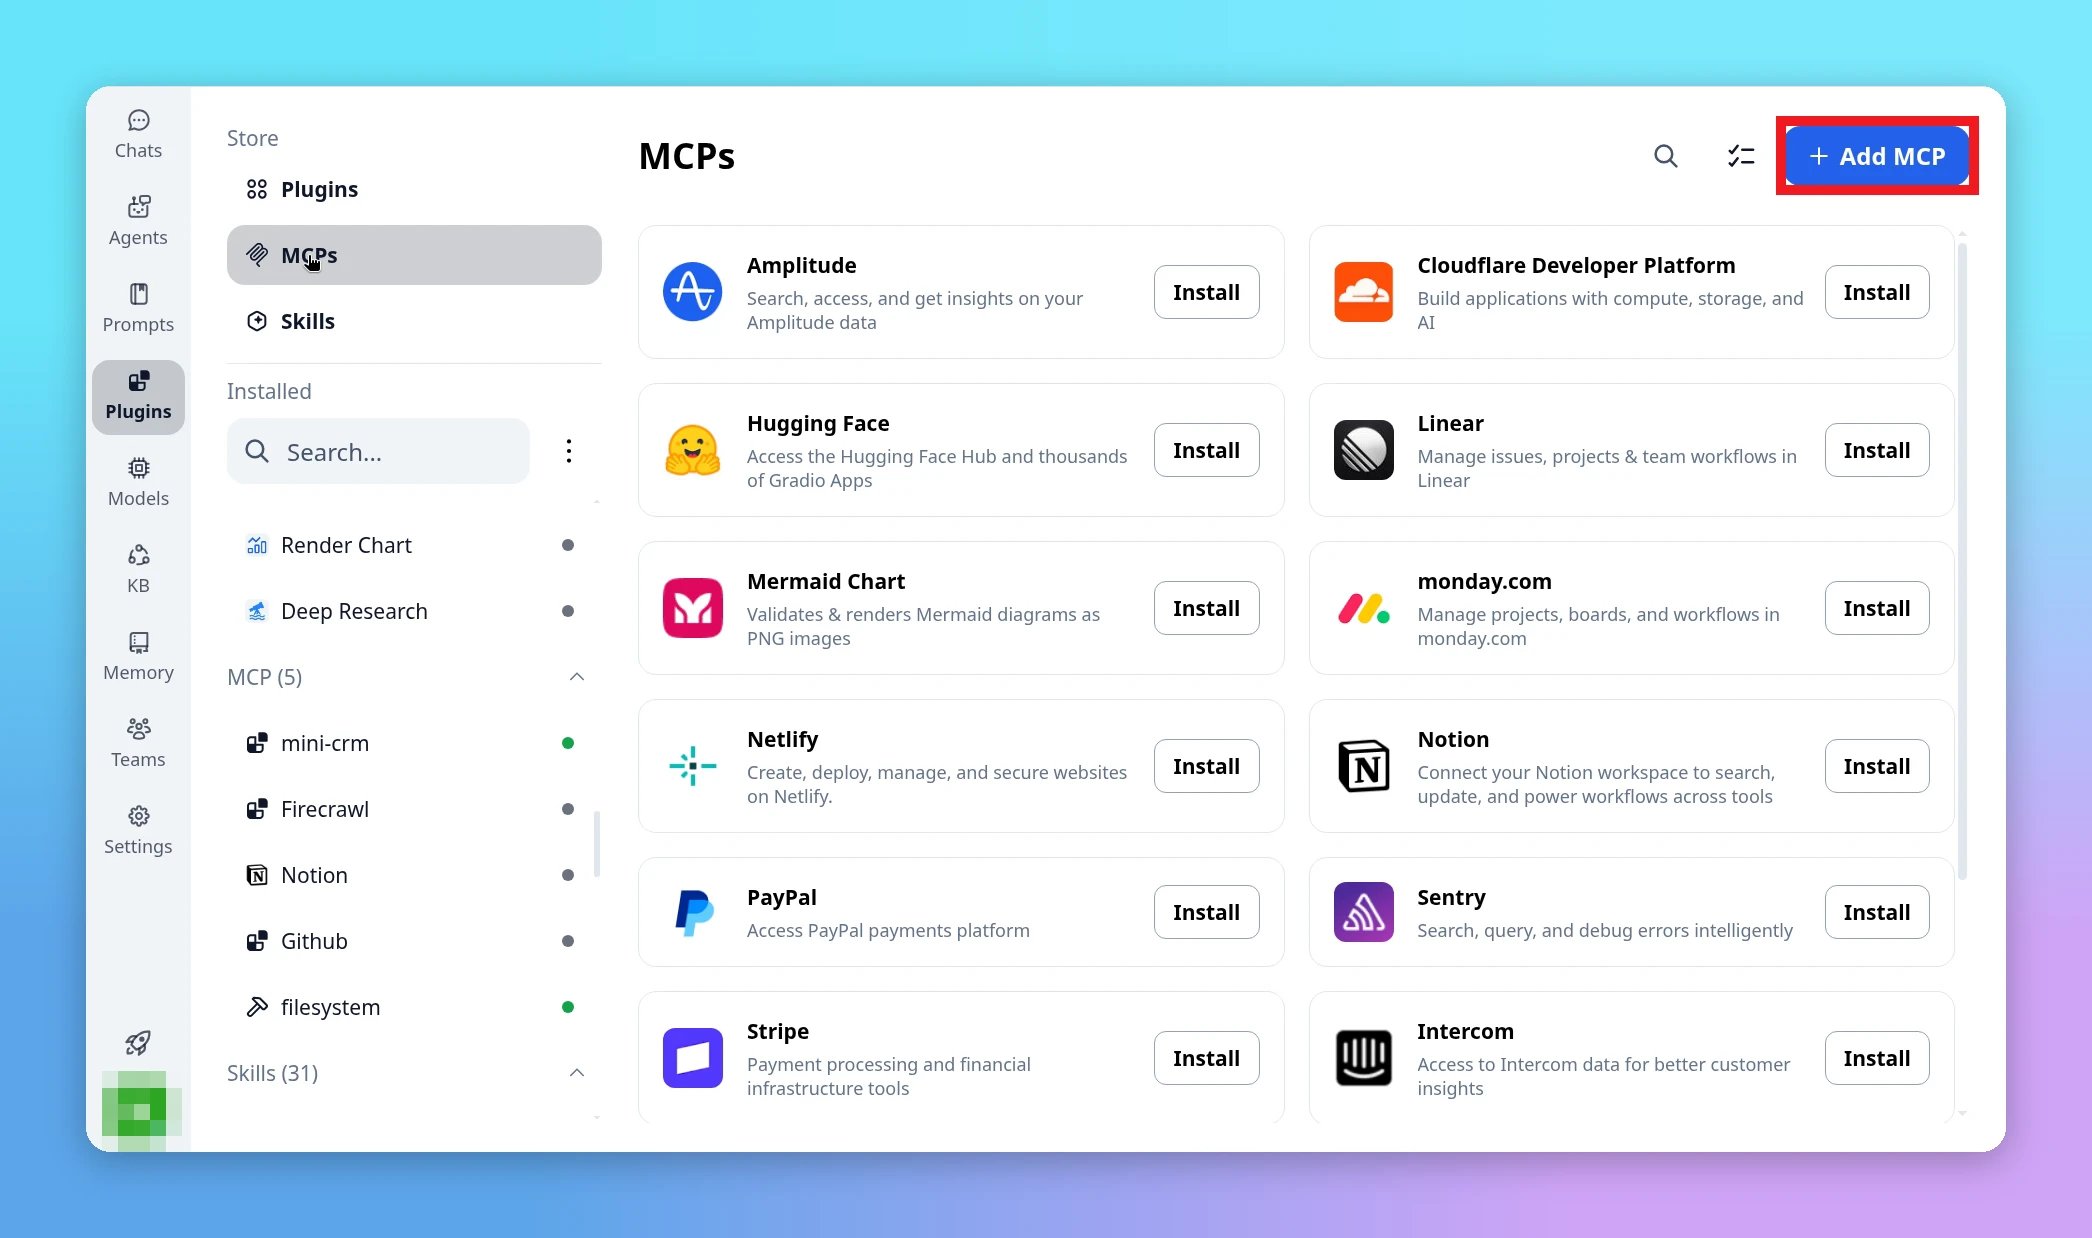
- Click Plugins in the left sidebar.
-
Under Store, click MCPs, then click + Add MCP (top right).
-
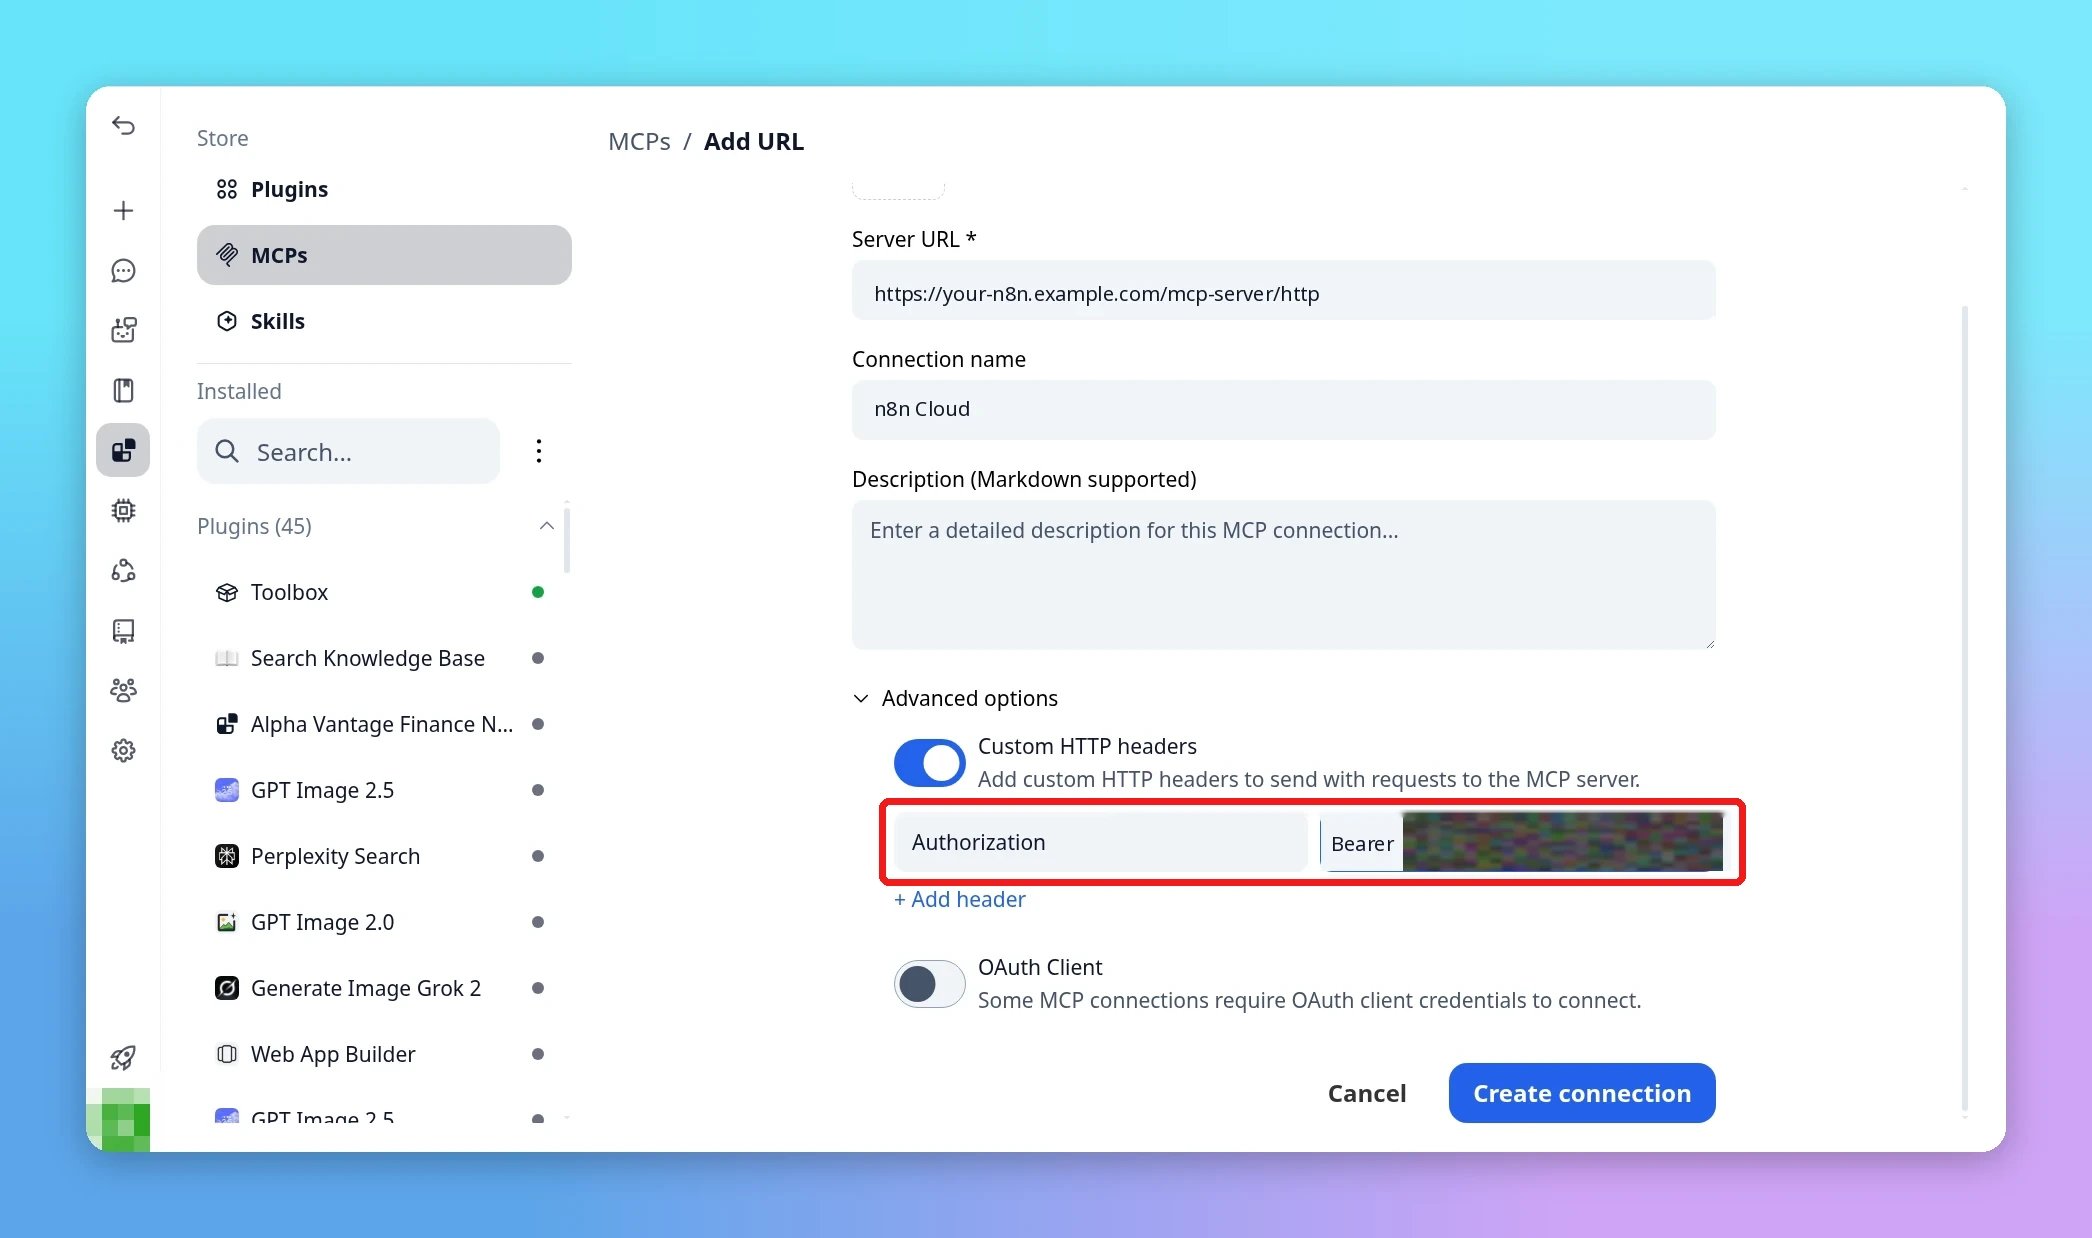
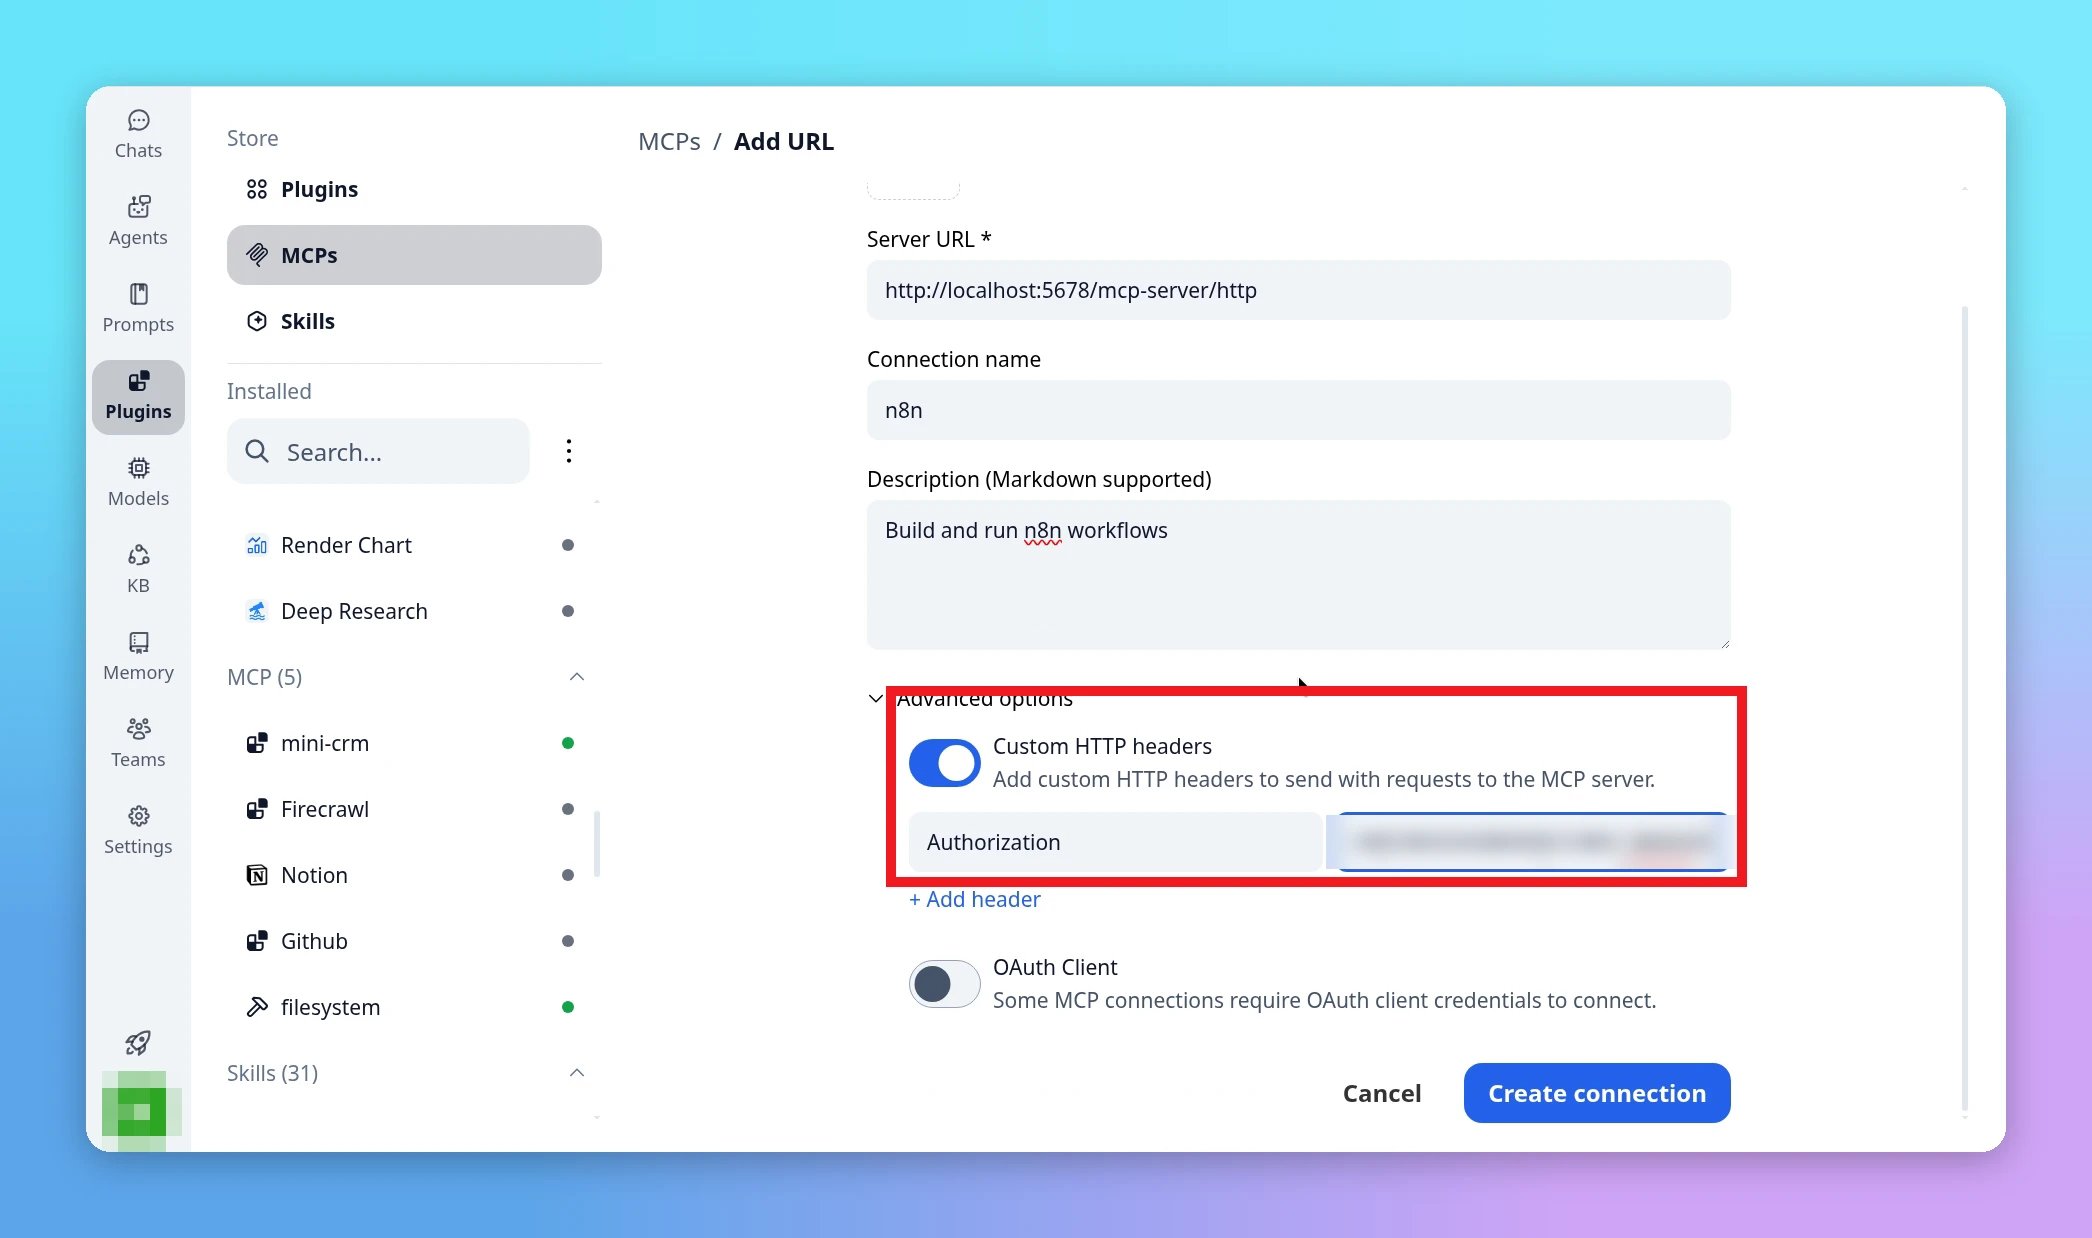
The Add Custom MCP Server URL page opens (MCPs / Add URL). Fill in:
- Server URL: the HTTPS Server URL from n8n, for example
https://your-n8n.example.com/mcp-server/http - Connection name:
n8n(orn8n Cloud) - Description (optional): for example, “Build and run n8n workflows”.
- Server URL: the HTTPS Server URL from n8n, for example
-
Open Advanced options, turn on Custom HTTP headers, and add:
- Header name:
Authorization - Header value:
Bearer <your n8n MCP access token>
- Header name:
-
Click Create connection.
4
Choose TypingMind Cloud
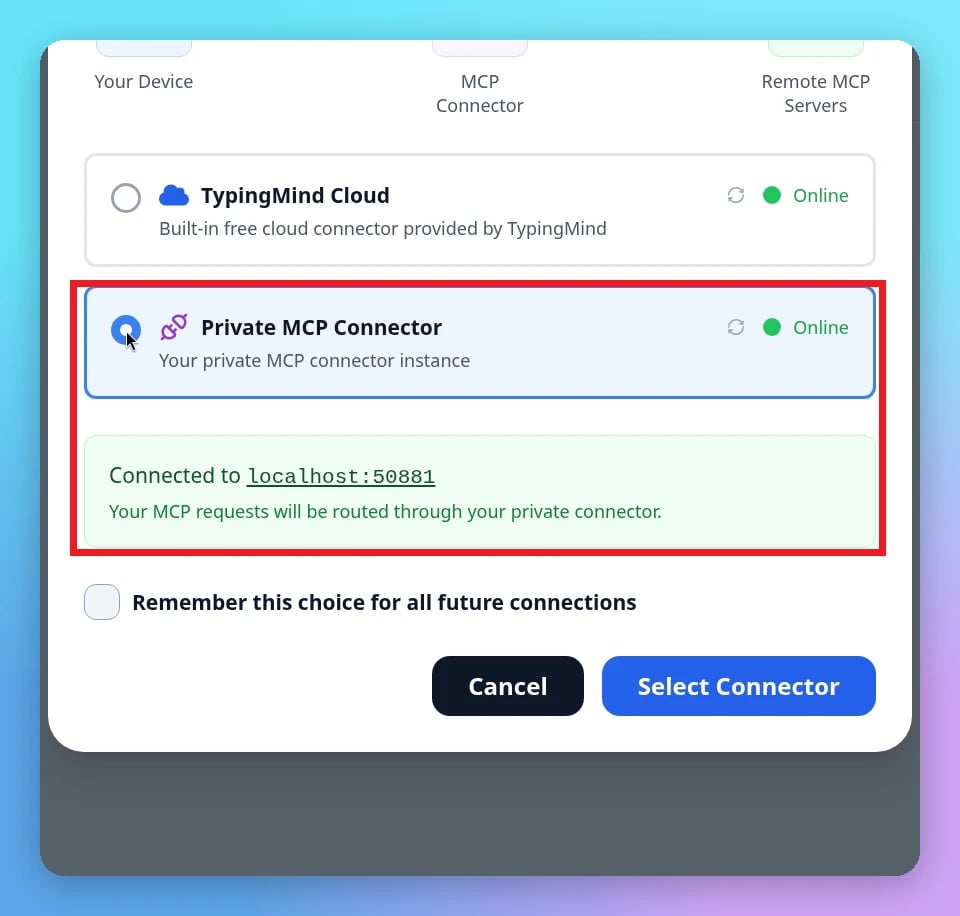
The new entry shows Connection Required via Select Connector. Click Connect. In the Select MCP Connector dialog, choose TypingMind Cloud, then click Select Connector. You don’t need the Private MCP Connector for this path.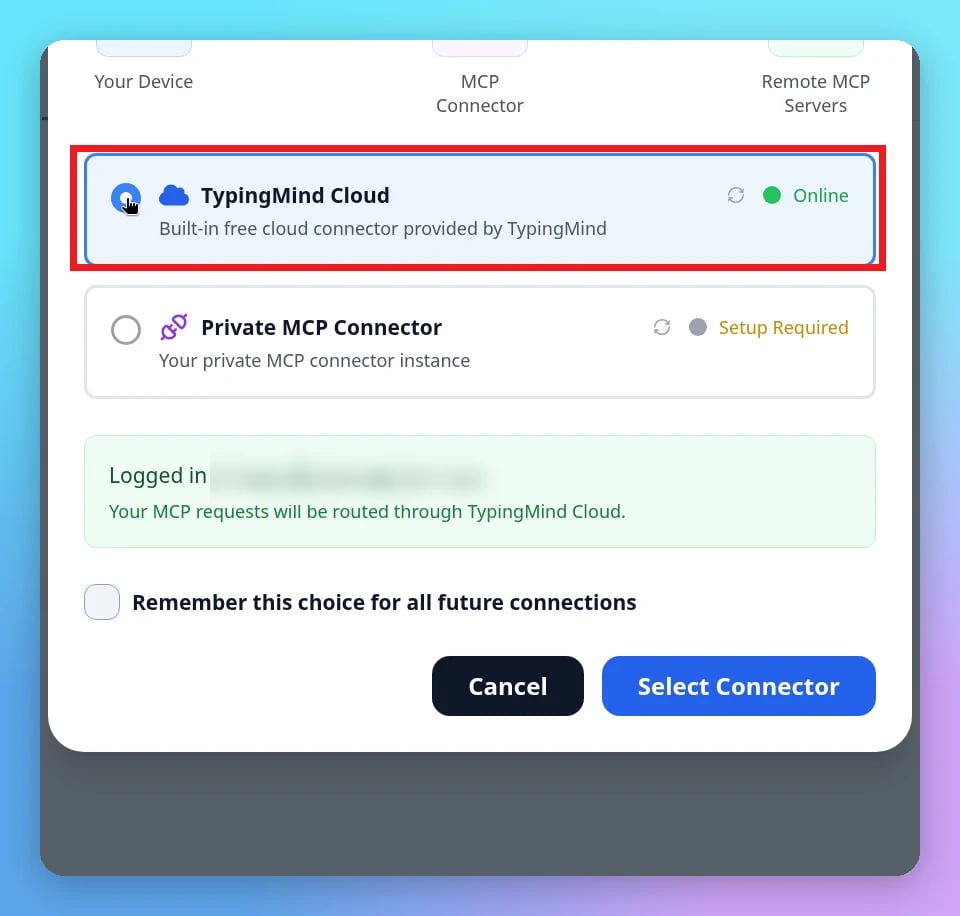
5
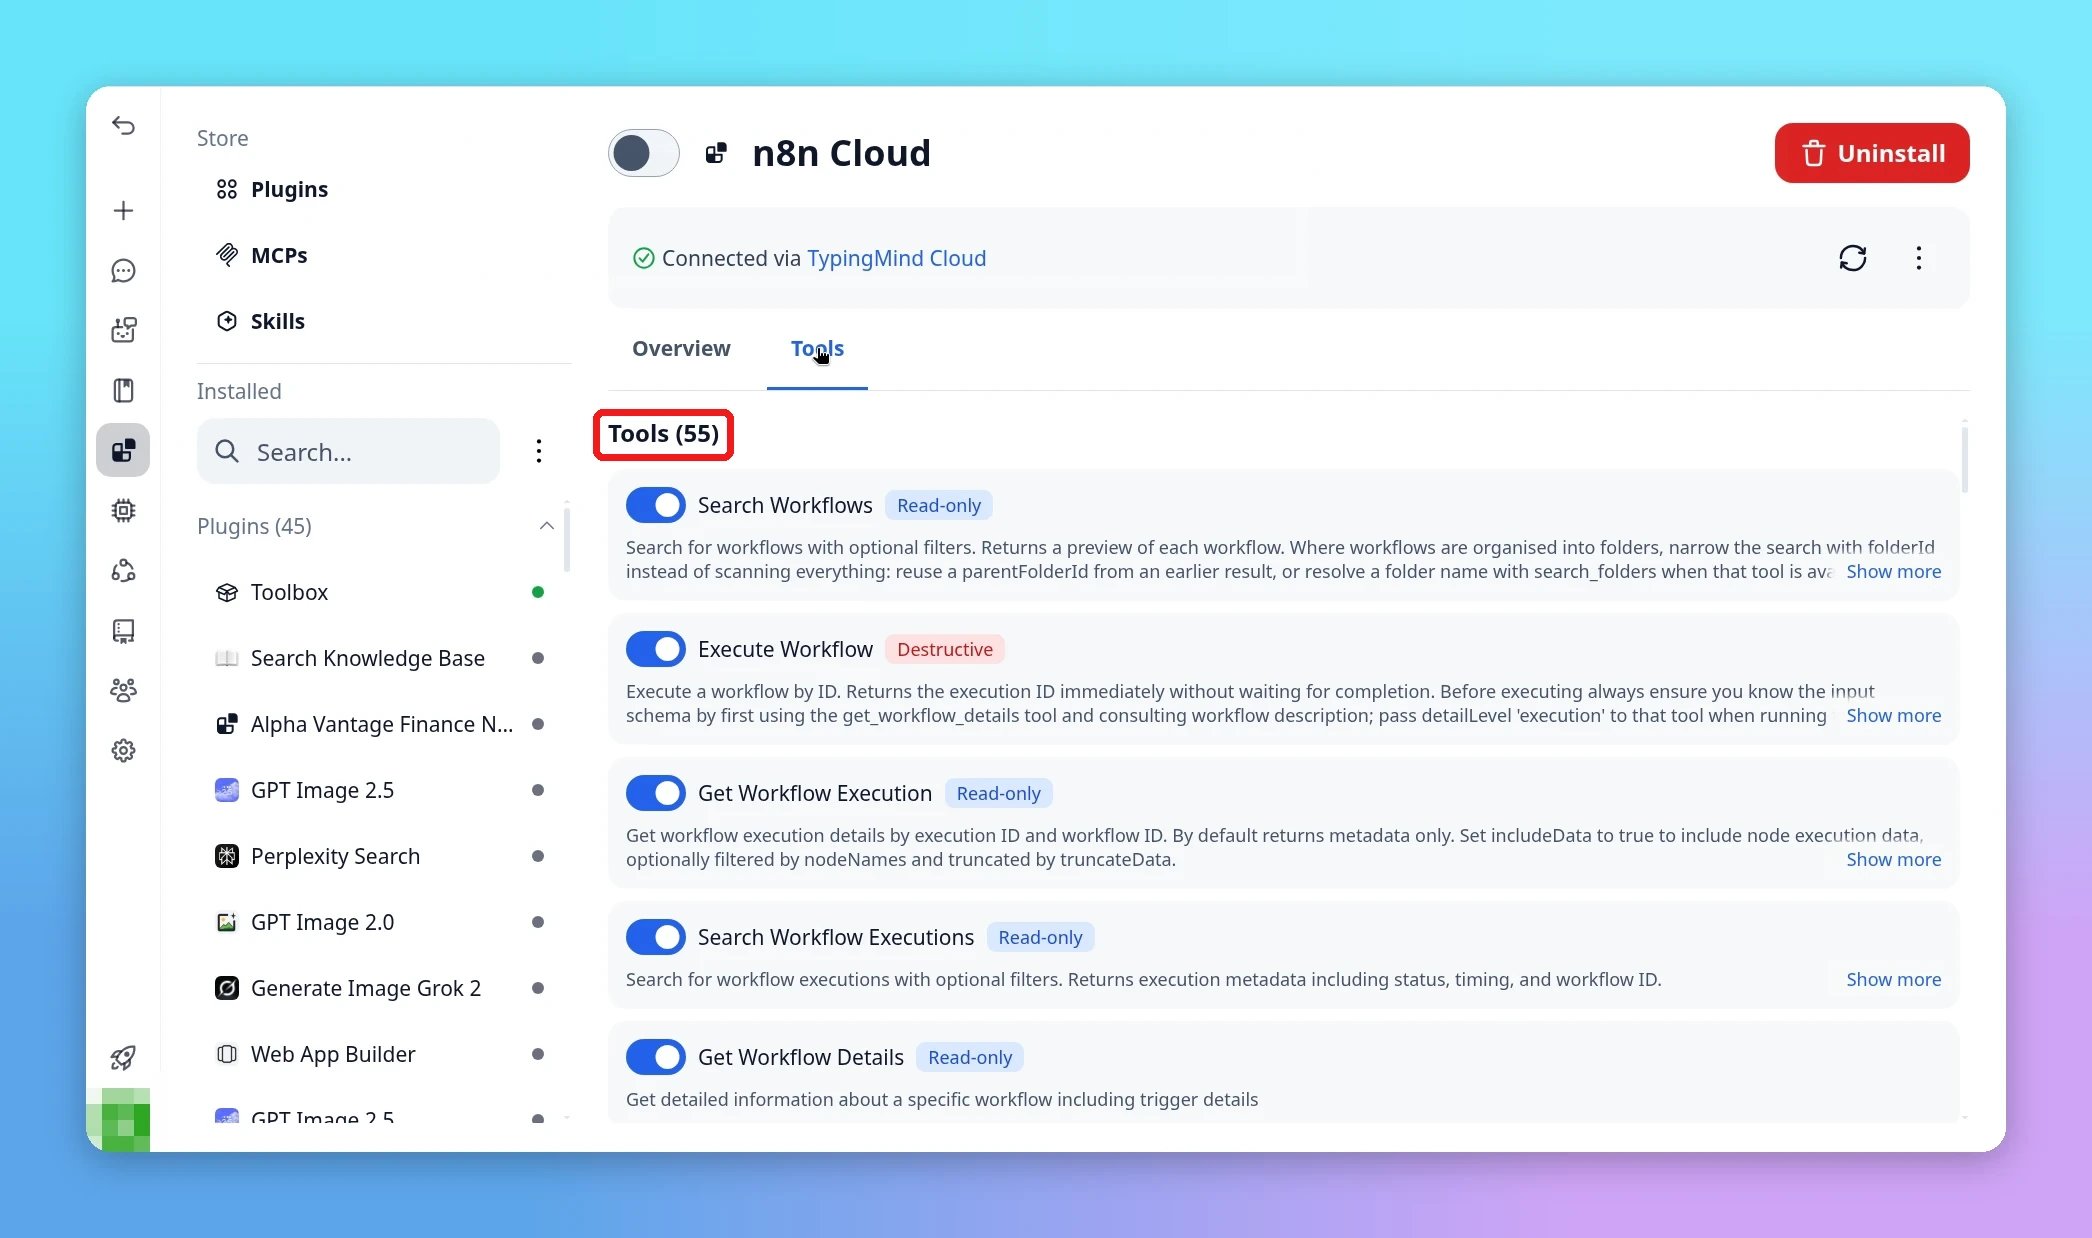
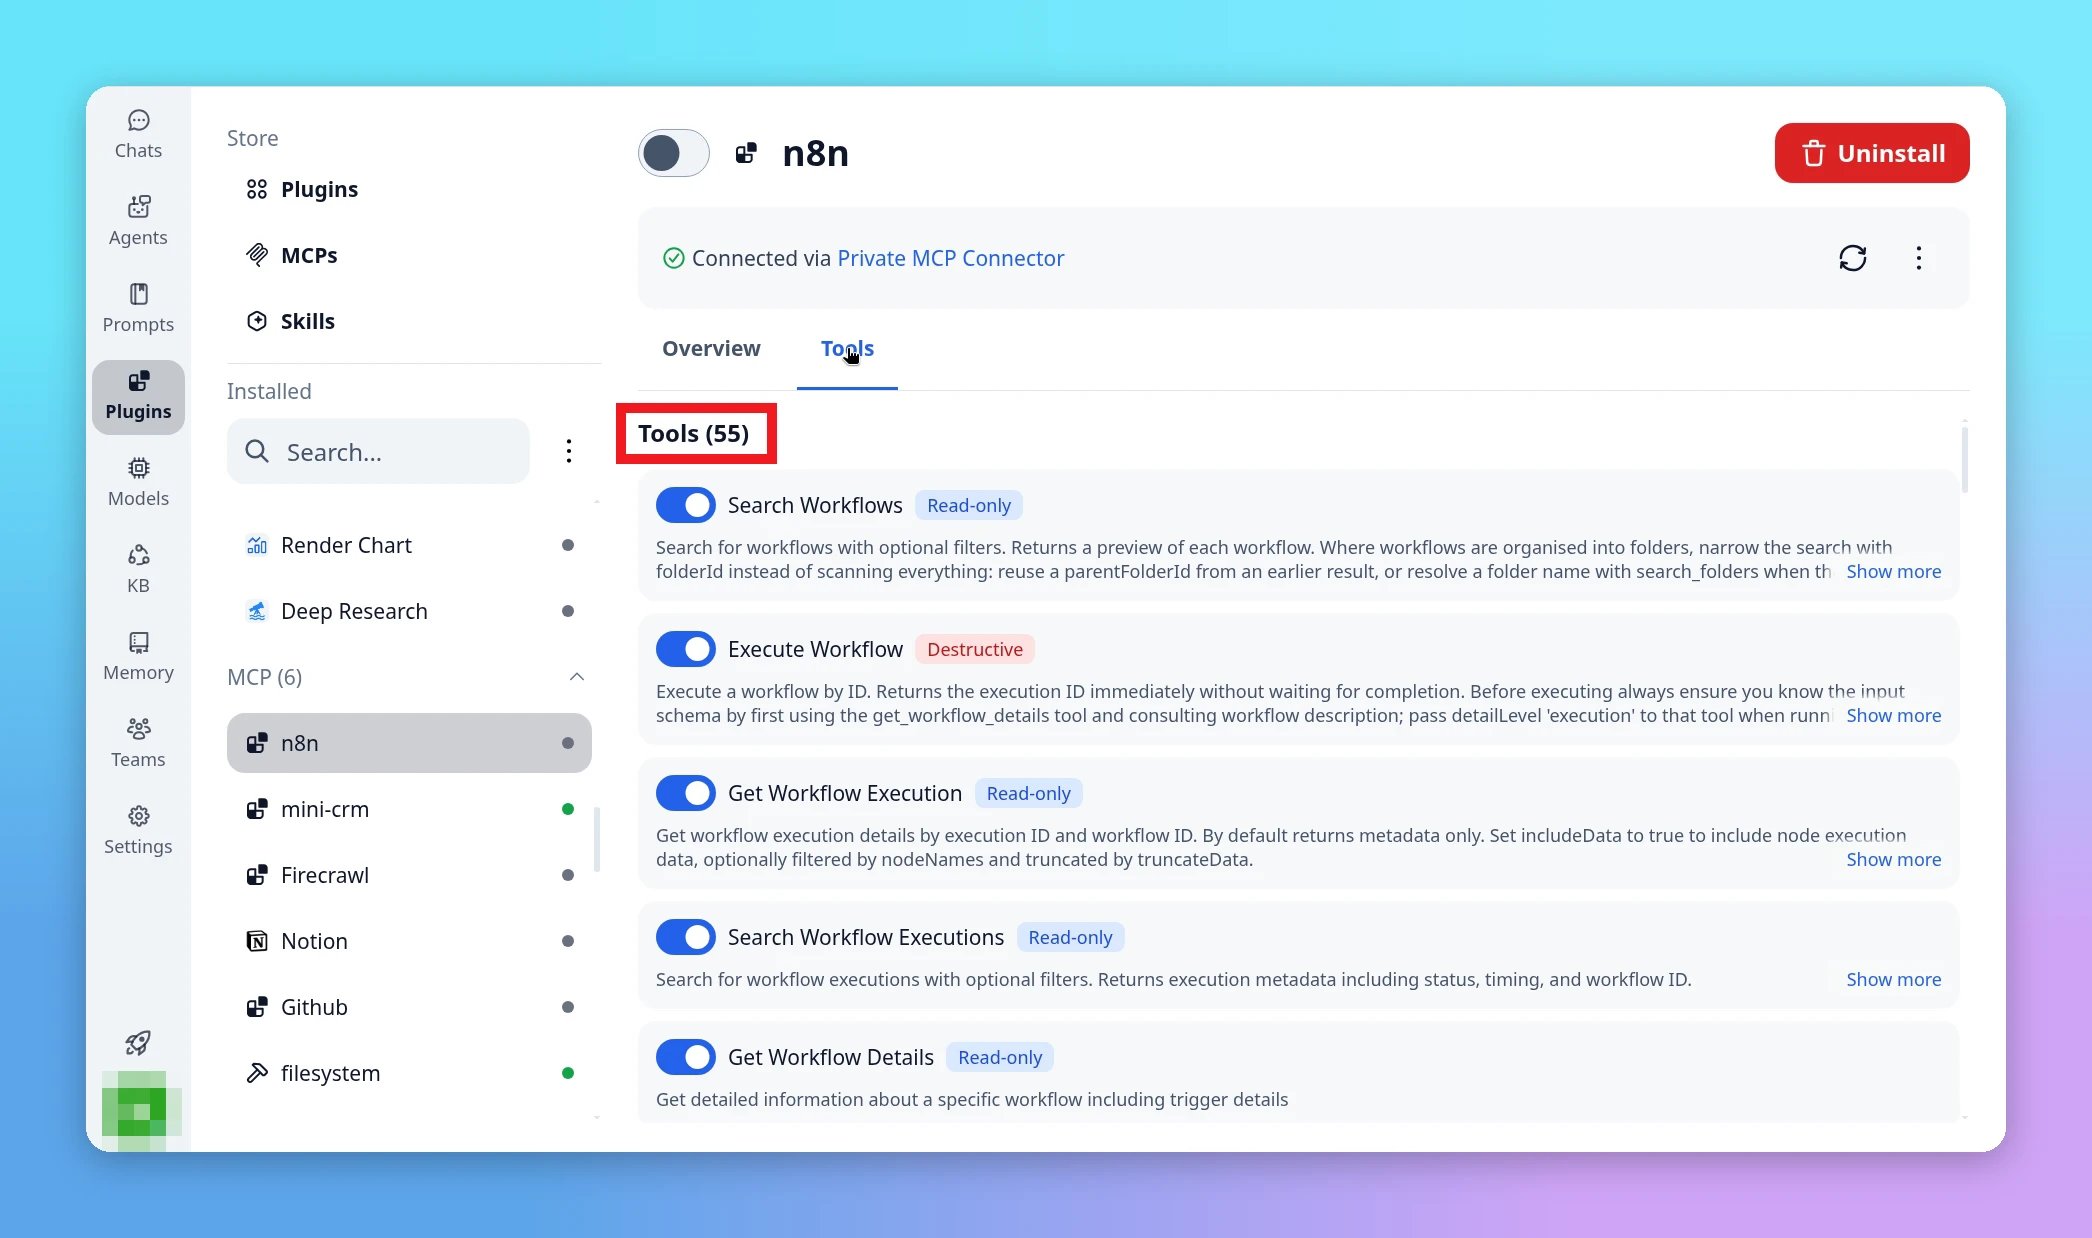
Check the connection and tools
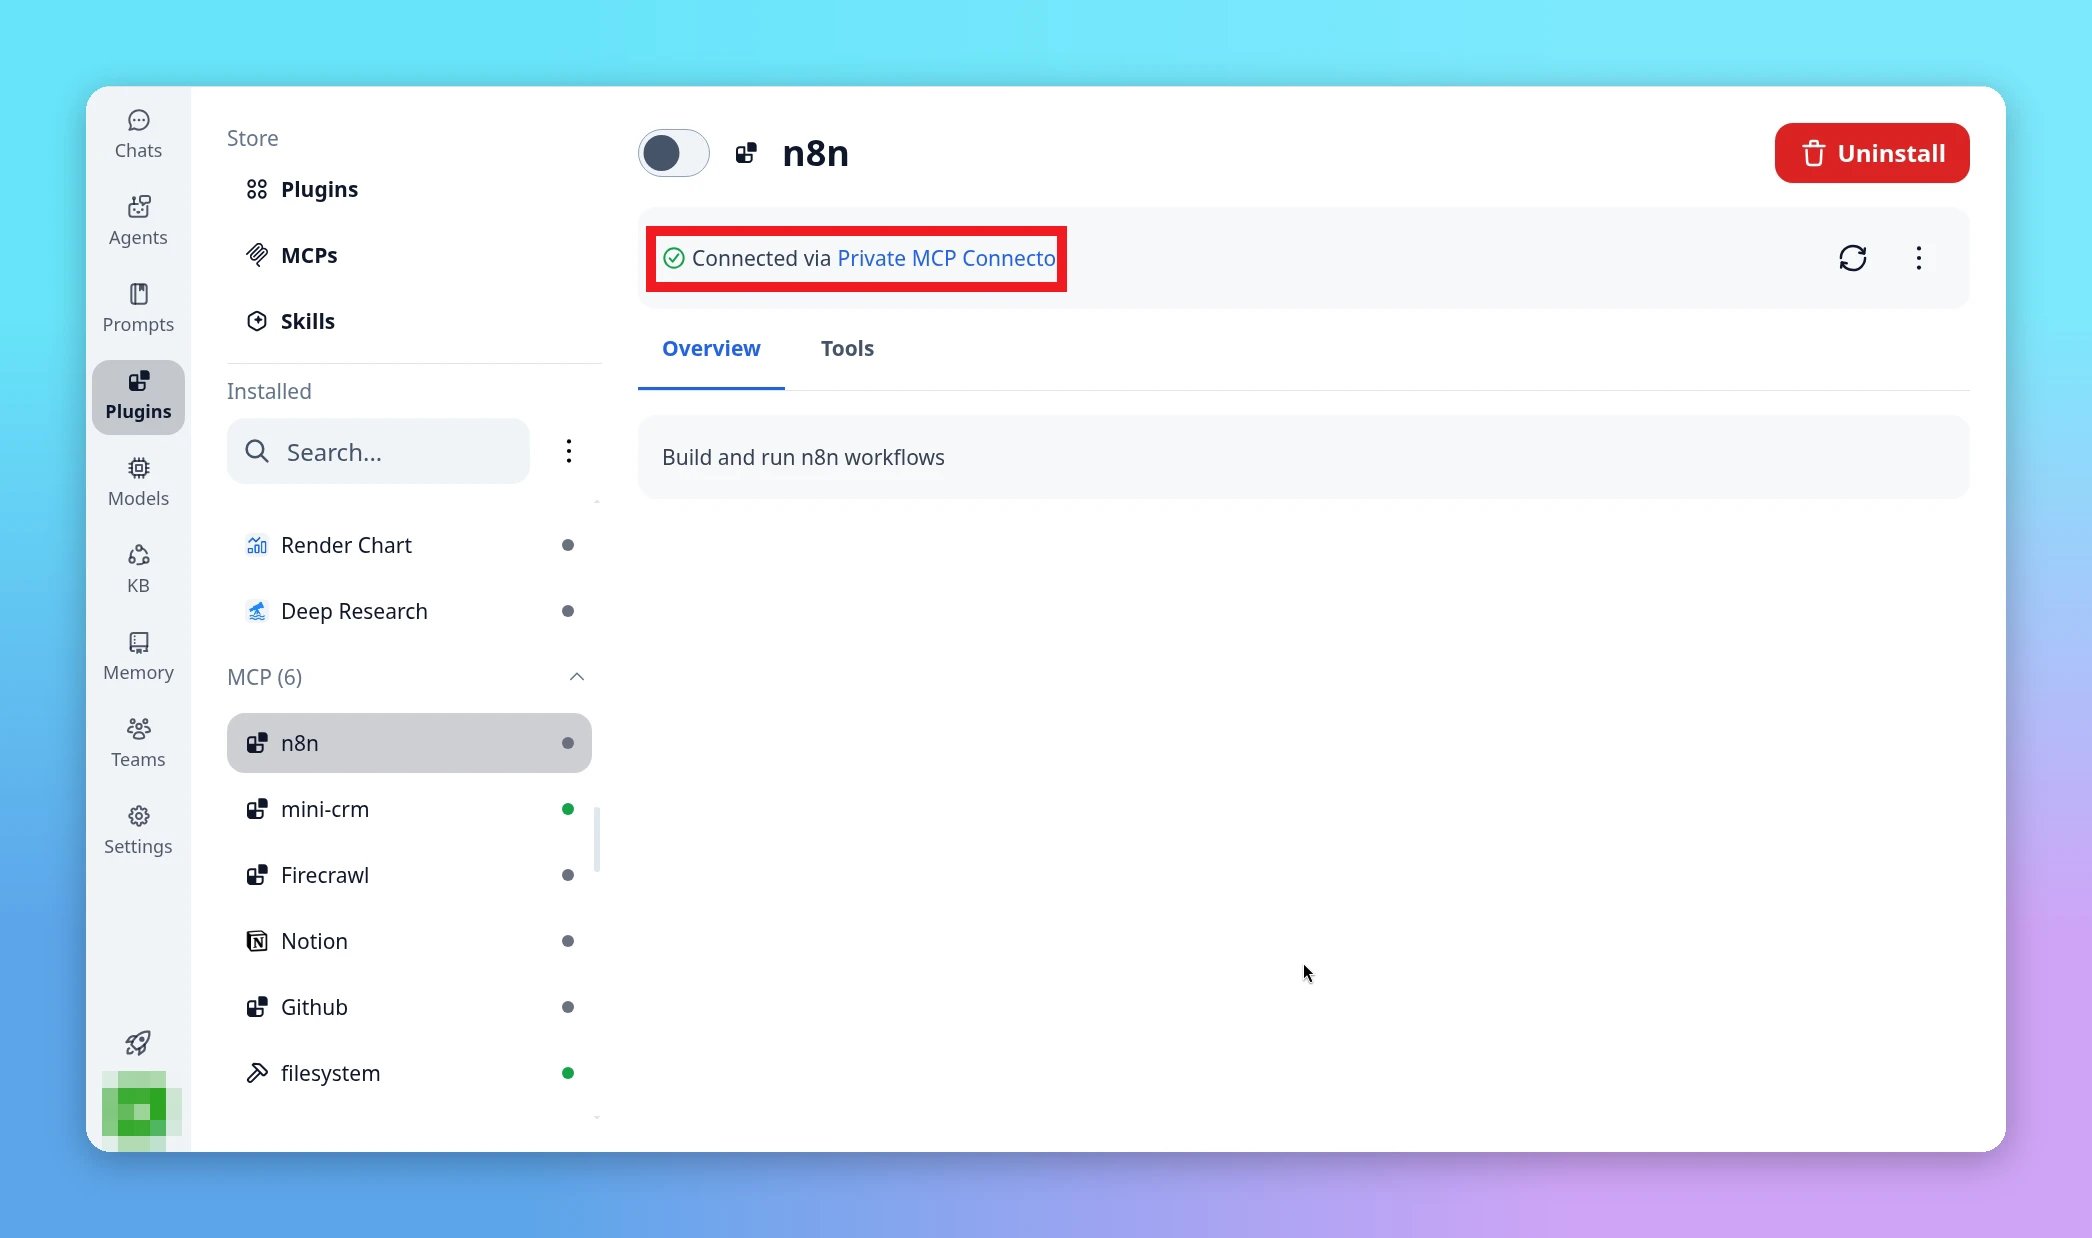
When it works, the entry shows ✓ Connected via TypingMind Cloud.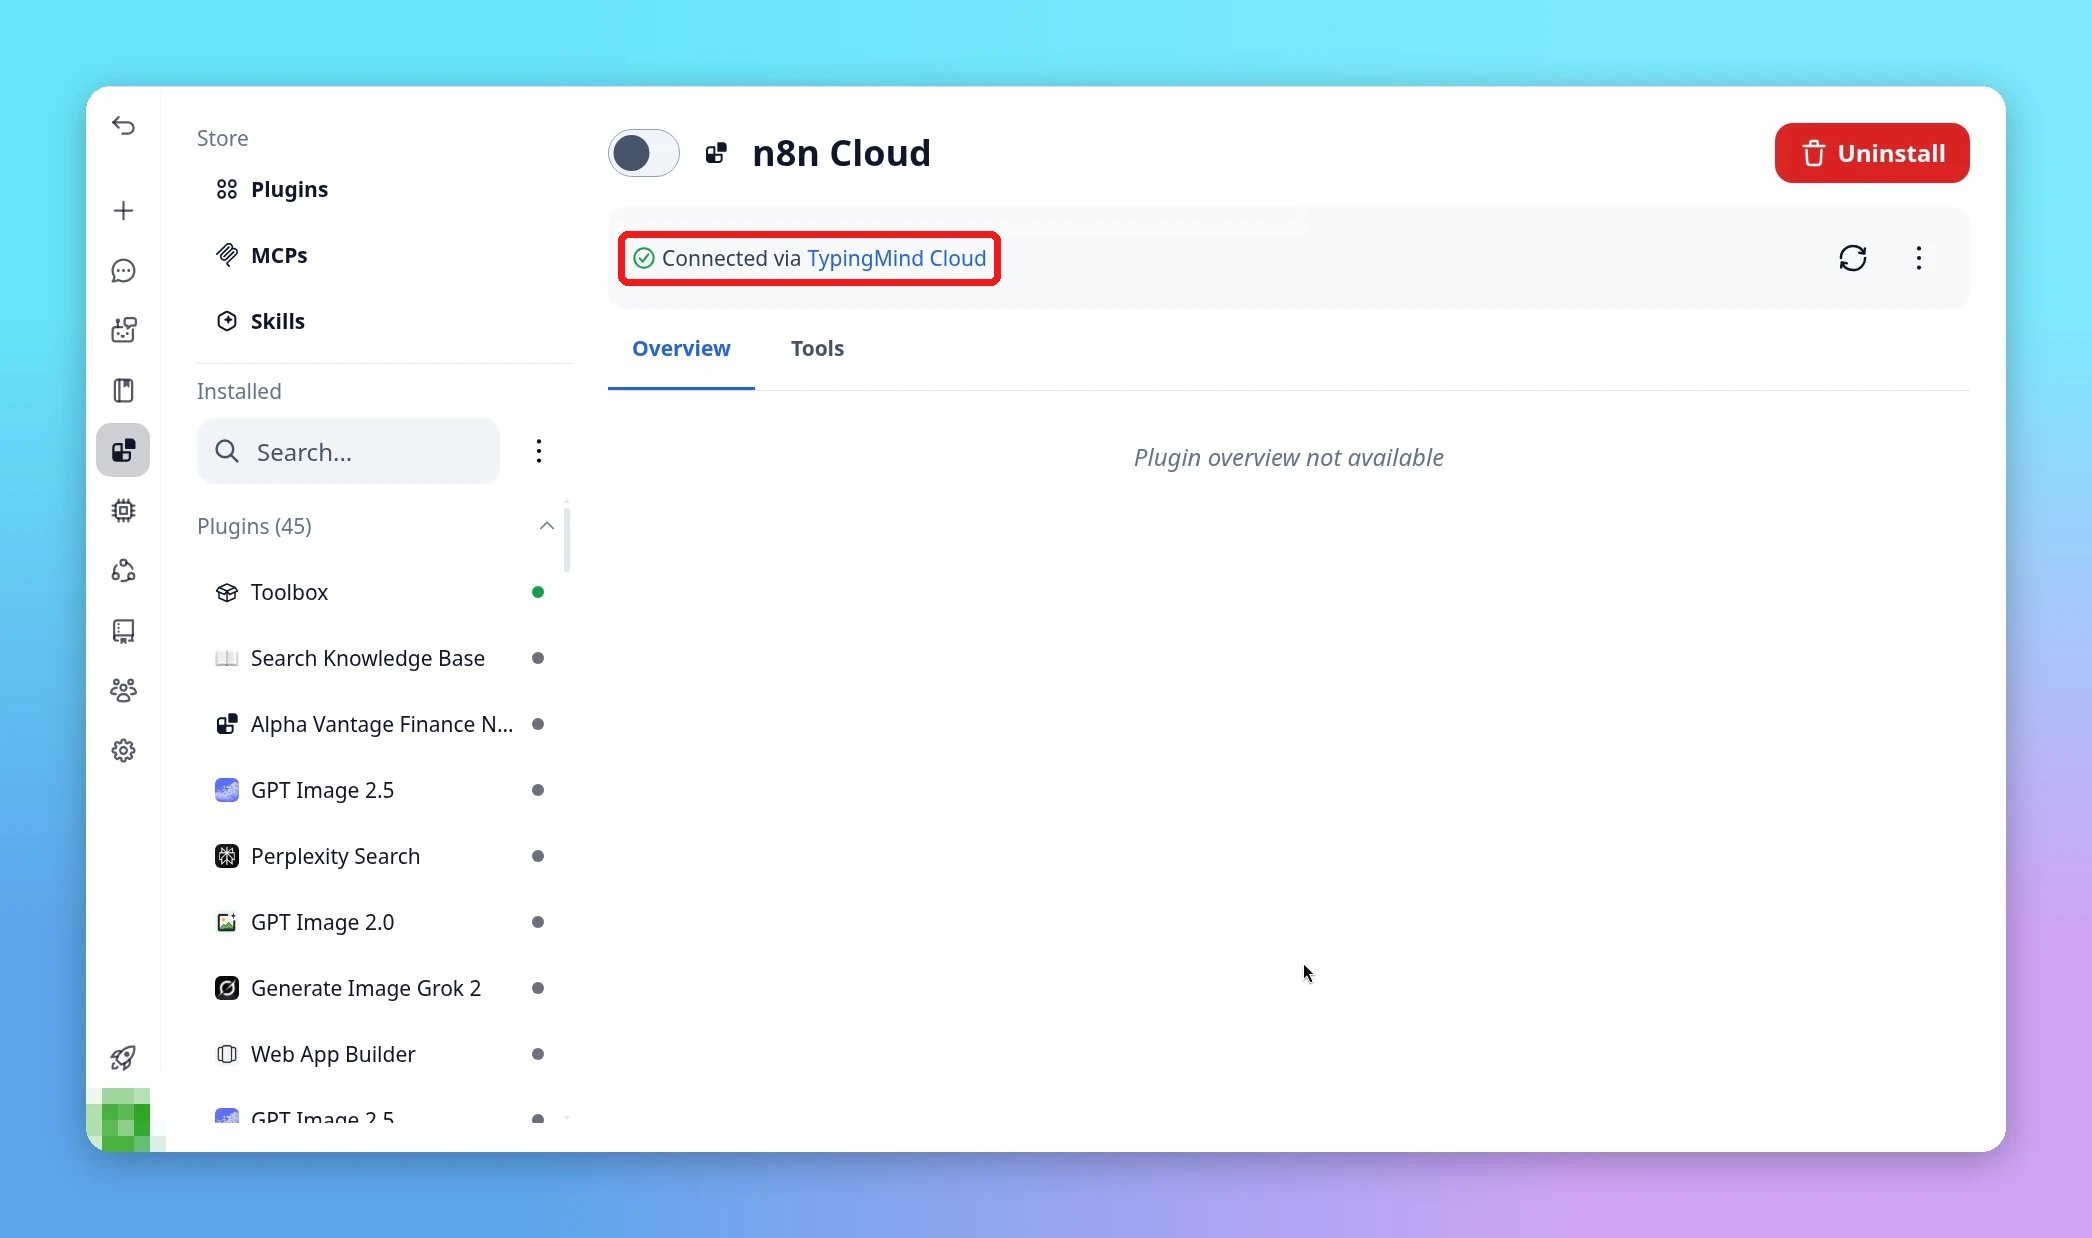
6
Turn on n8n in a chat
Start a new chat. Click the plugin selector next to the model name, type 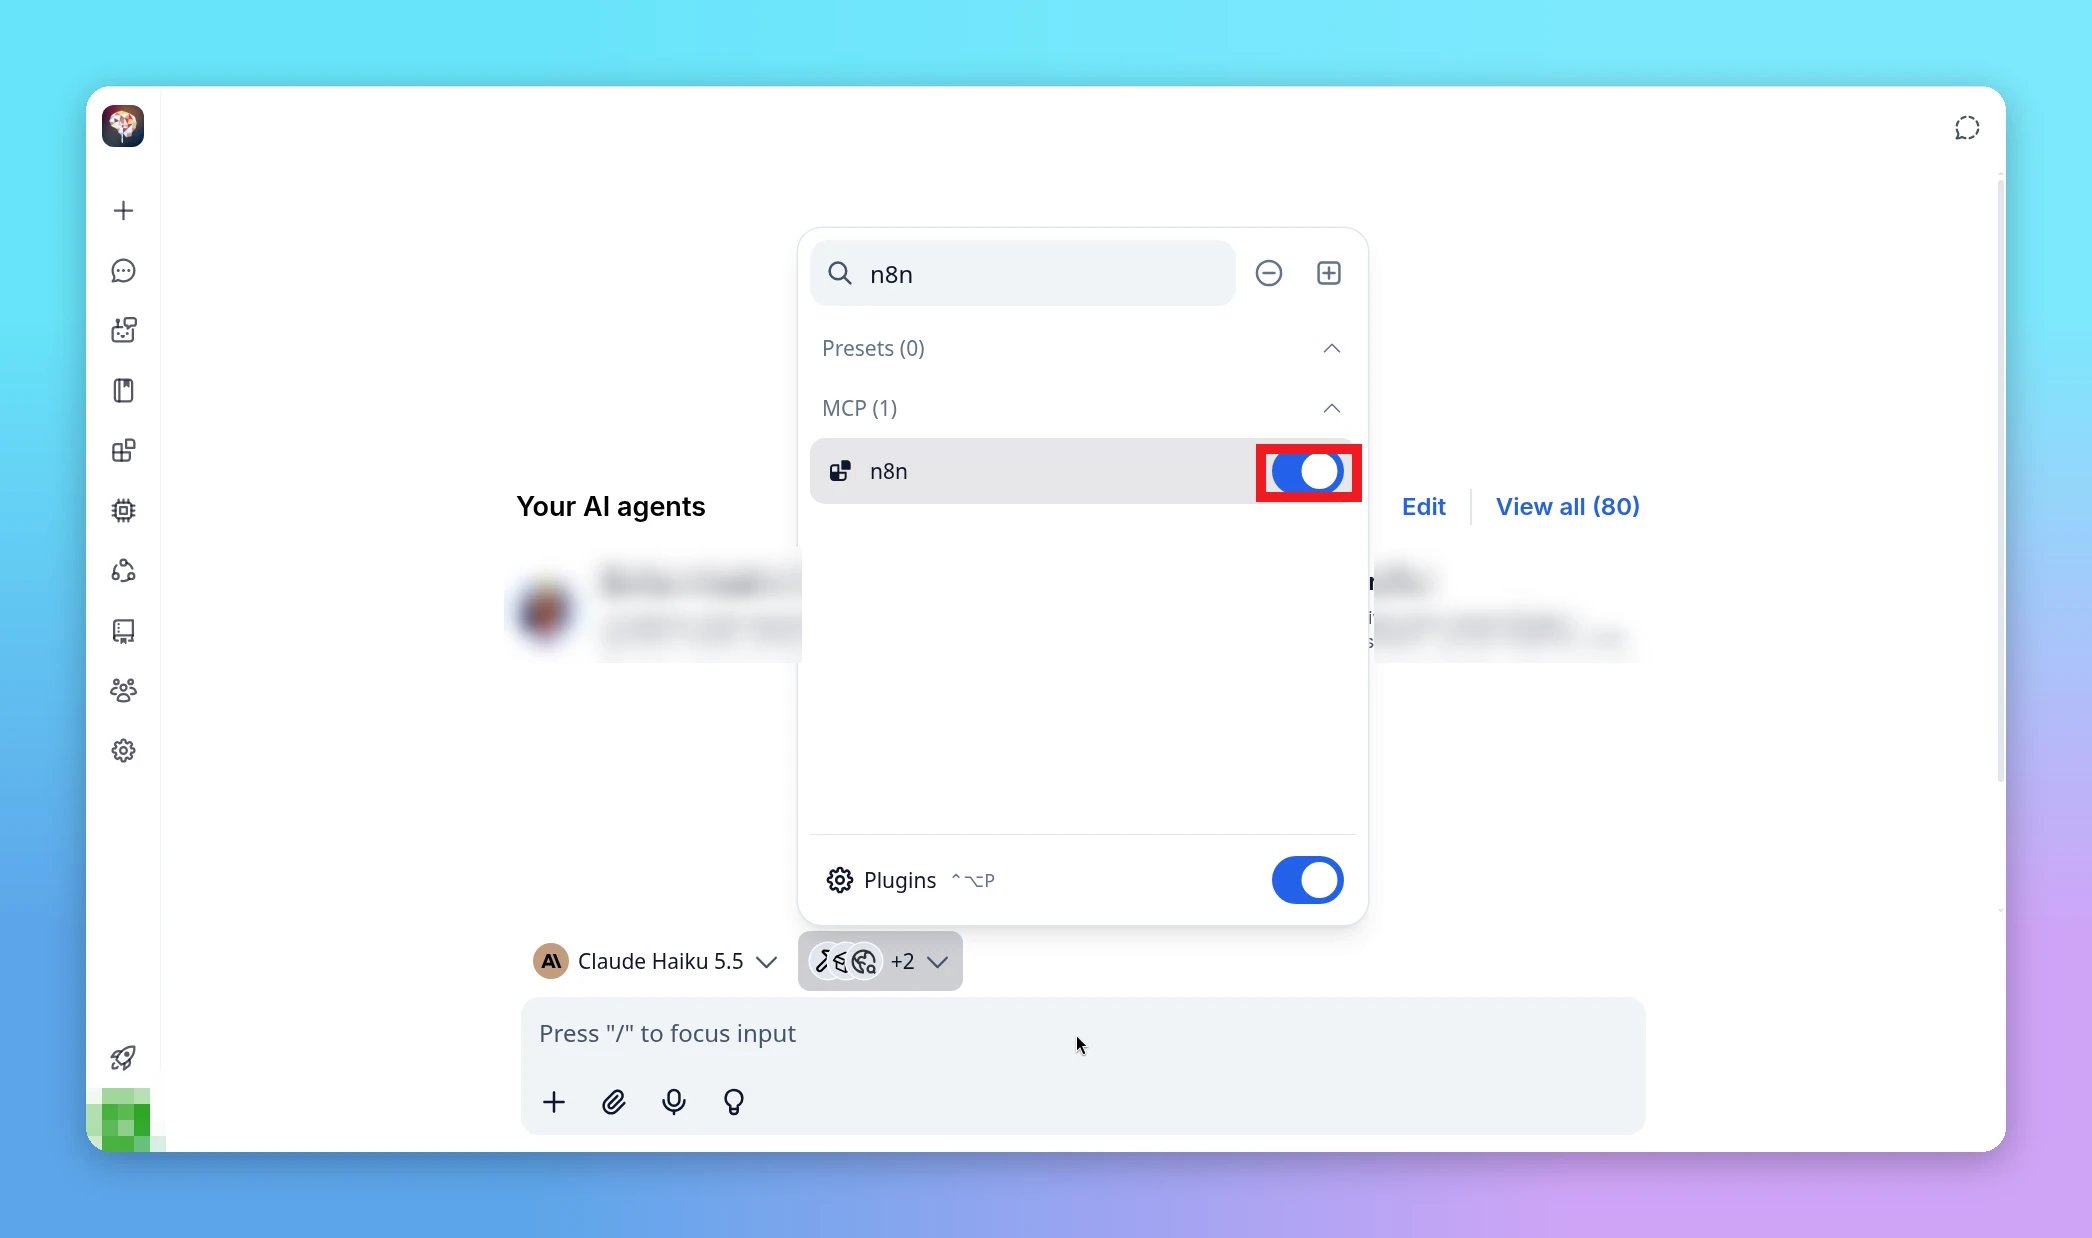
n8n in Search, and turn on n8n under MCP.The AI can only see workflows that are available in MCP. Workflows the AI creates are available automatically. To make an existing workflow available, open it in n8n, click … → Settings, and turn on Available in MCP.
Part 2: Build a support ticket workflow by chatting
In this example, a support form sends tickets to n8n. The AI builds a workflow that:- Receives each ticket (name, email, message) through a webhook.
- Sorts the ticket by priority (urgent, normal, or spam) and category (billing, technical, feature request, or general).
- Saves urgent tickets as
needs_reply_nowand normal tickets asqueuedin an n8n data table calledsupport_tickets. - Replies to the form with how long the customer will wait: 1 hour for urgent tickets, 1 business day for normal ones. Spam is ignored.
- Every day at 5 PM, builds a digest of the queued tickets, grouped by category.
1
Ask the AI to build the workflow
With the n8n plugin turned on, send:The AI works in several steps. It reads n8n’s workflow reference, looks up the nodes it needs, creates the 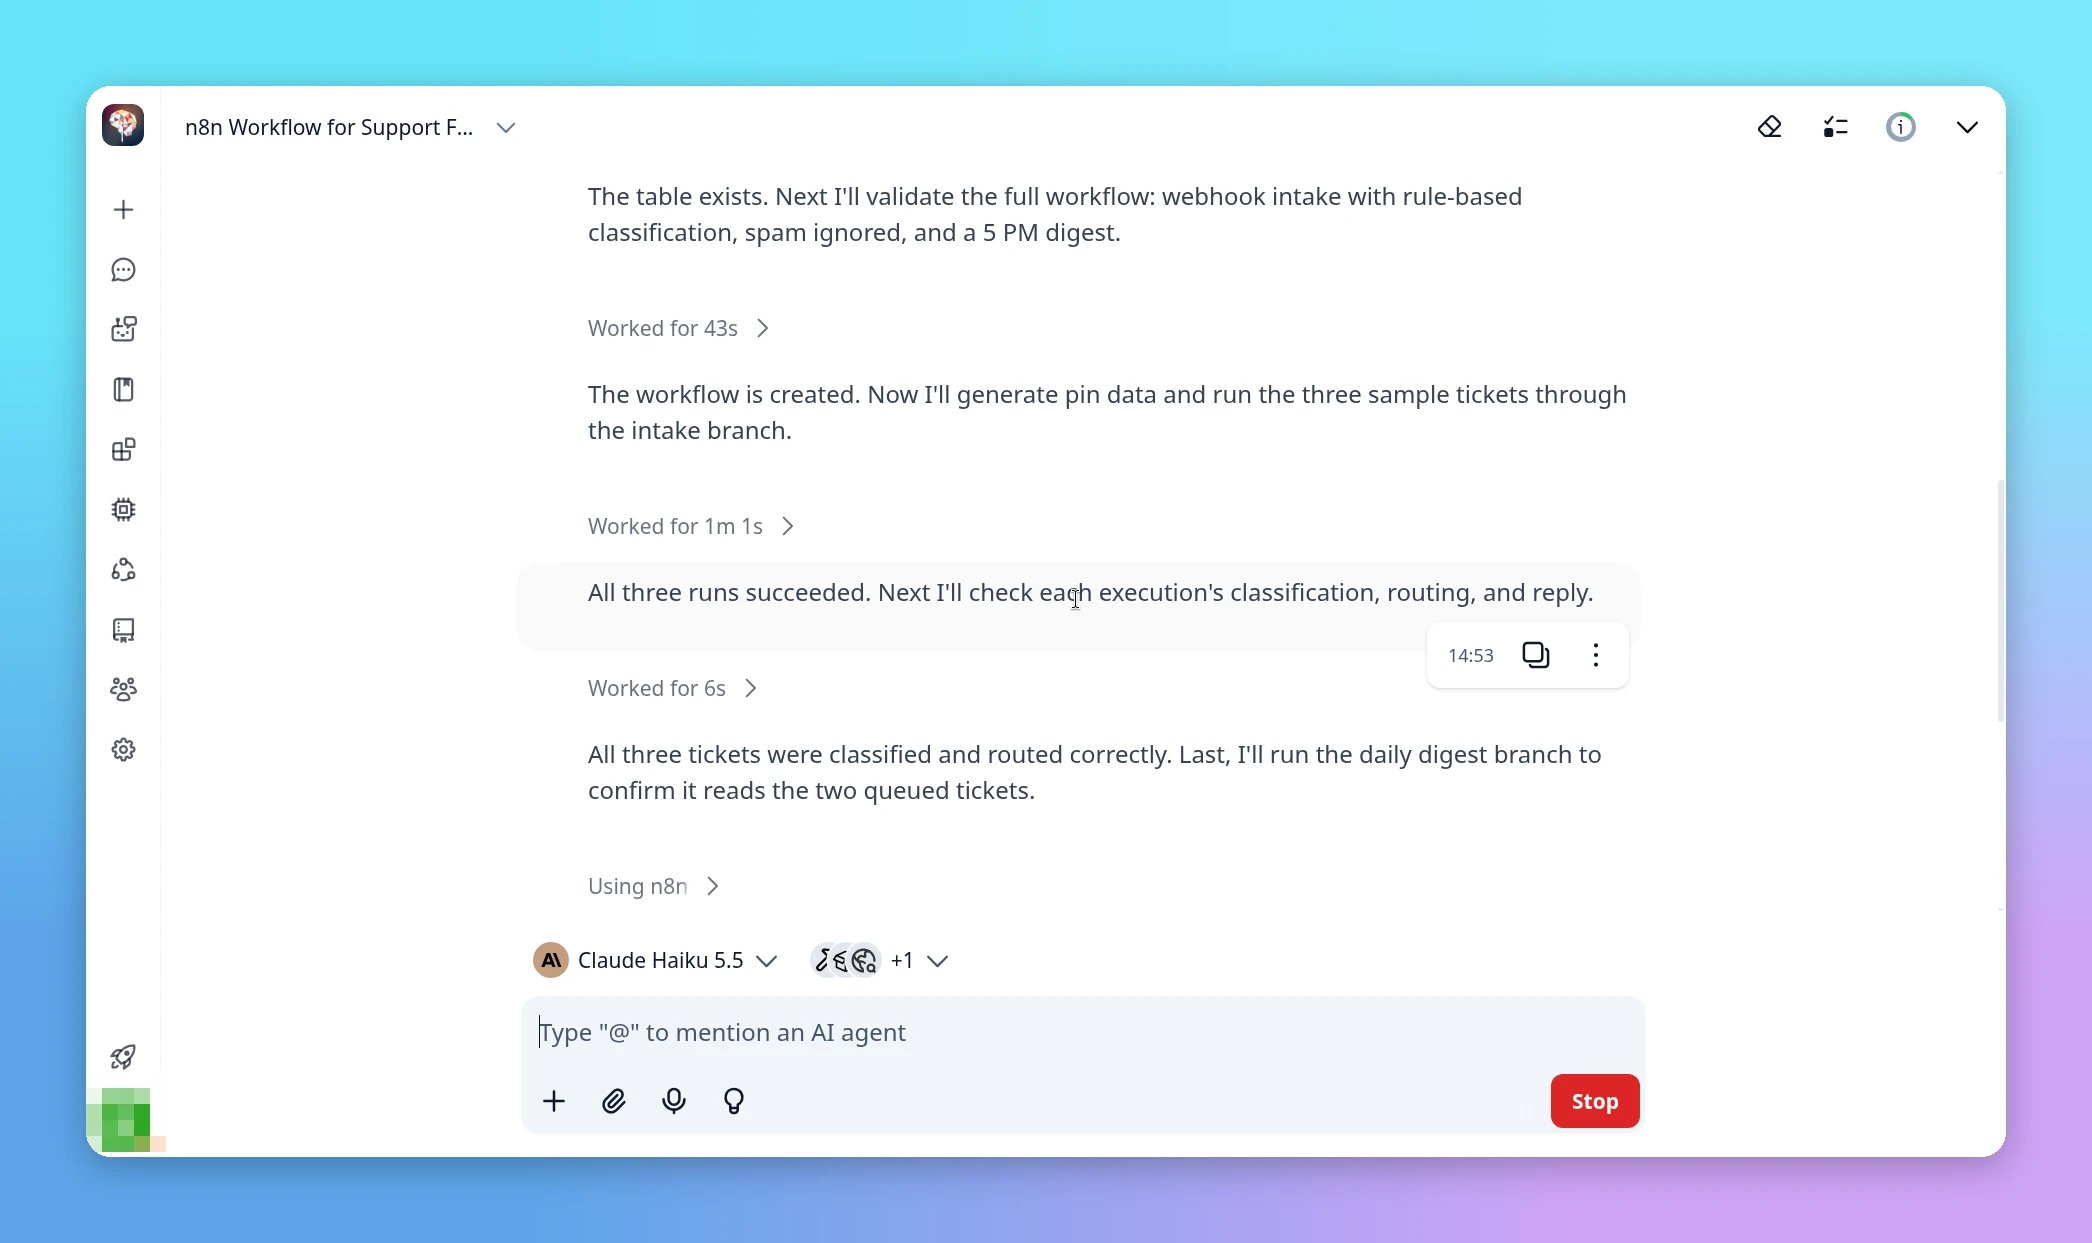
support_tickets data table, validates the workflow, and then saves it to n8n.Building takes a few minutes and many tool calls. If validation fails, n8n explains what’s wrong, and the AI fixes it and tries again on its own. That’s normal.
2
See the workflow in n8n
Open n8n in another tab. The new workflow is in your Overview list. Open it to see the canvas: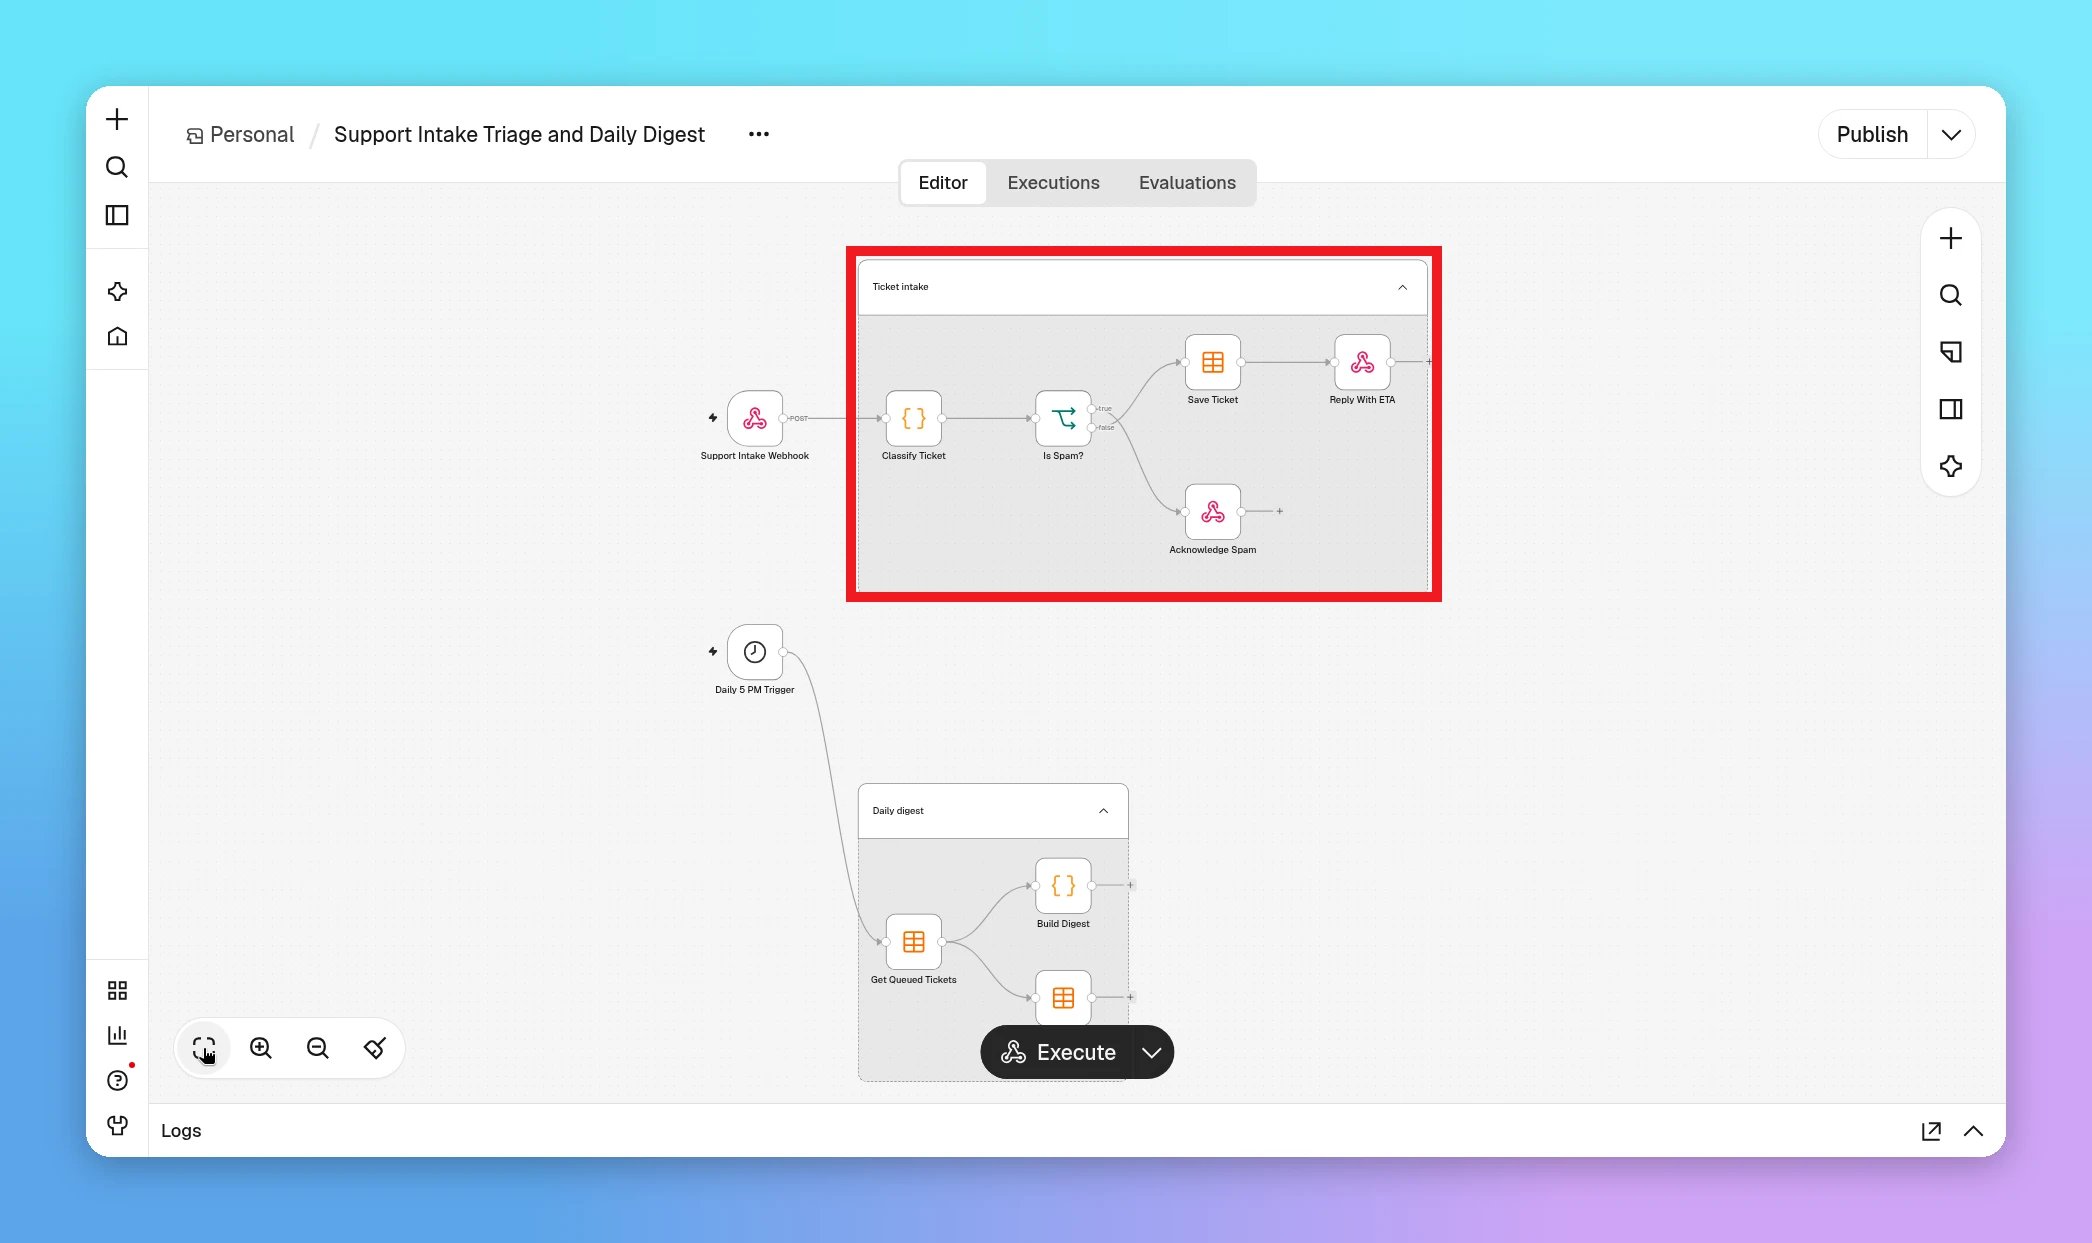
3
Test it with sample tickets
If you included “test it” in your first message, the AI runs the test right away. You can also ask for it:The AI runs the workflow once per ticket (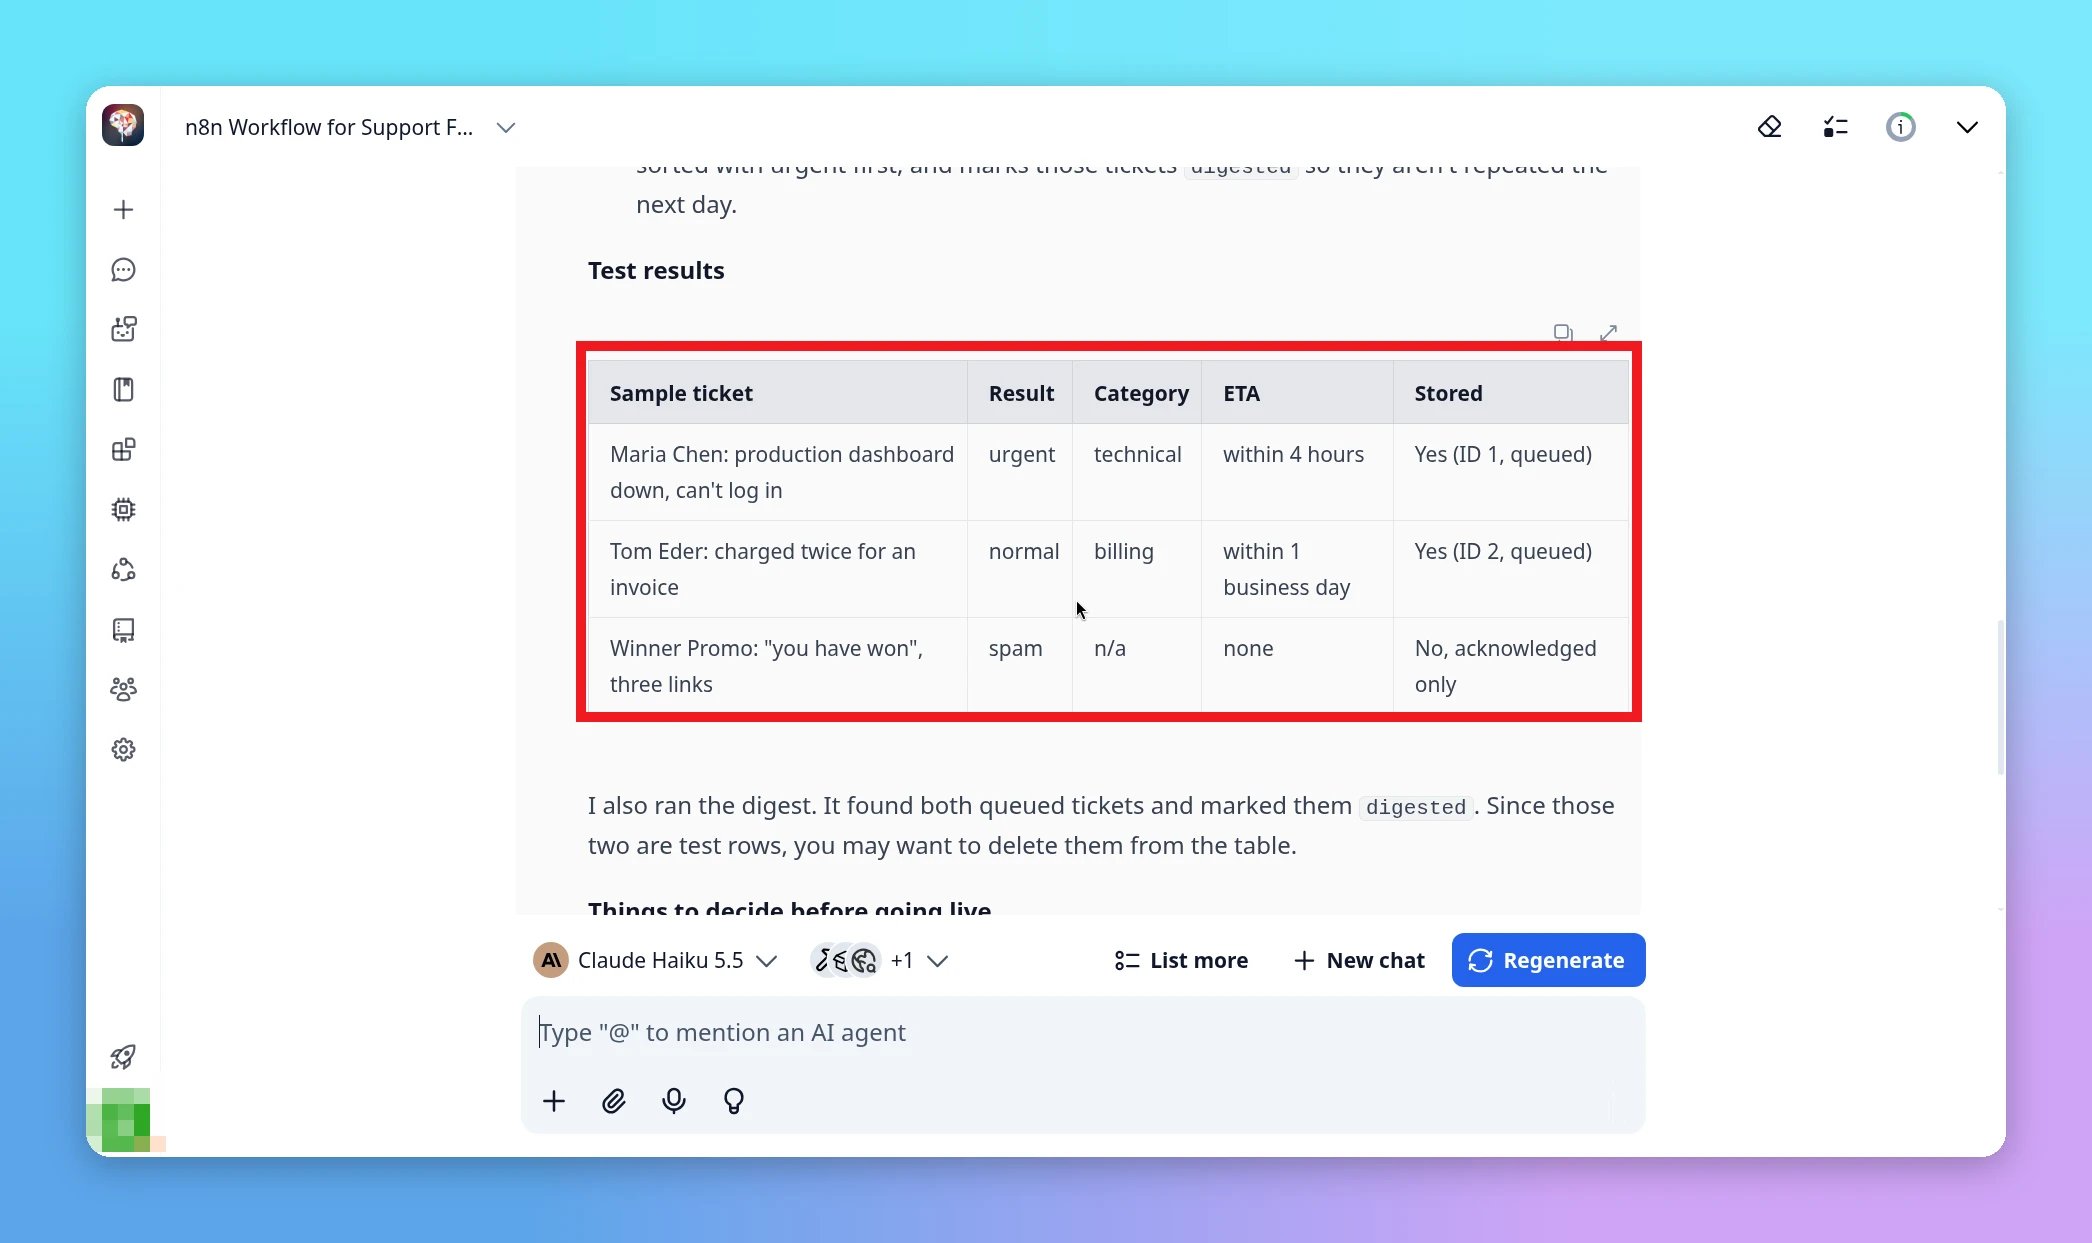
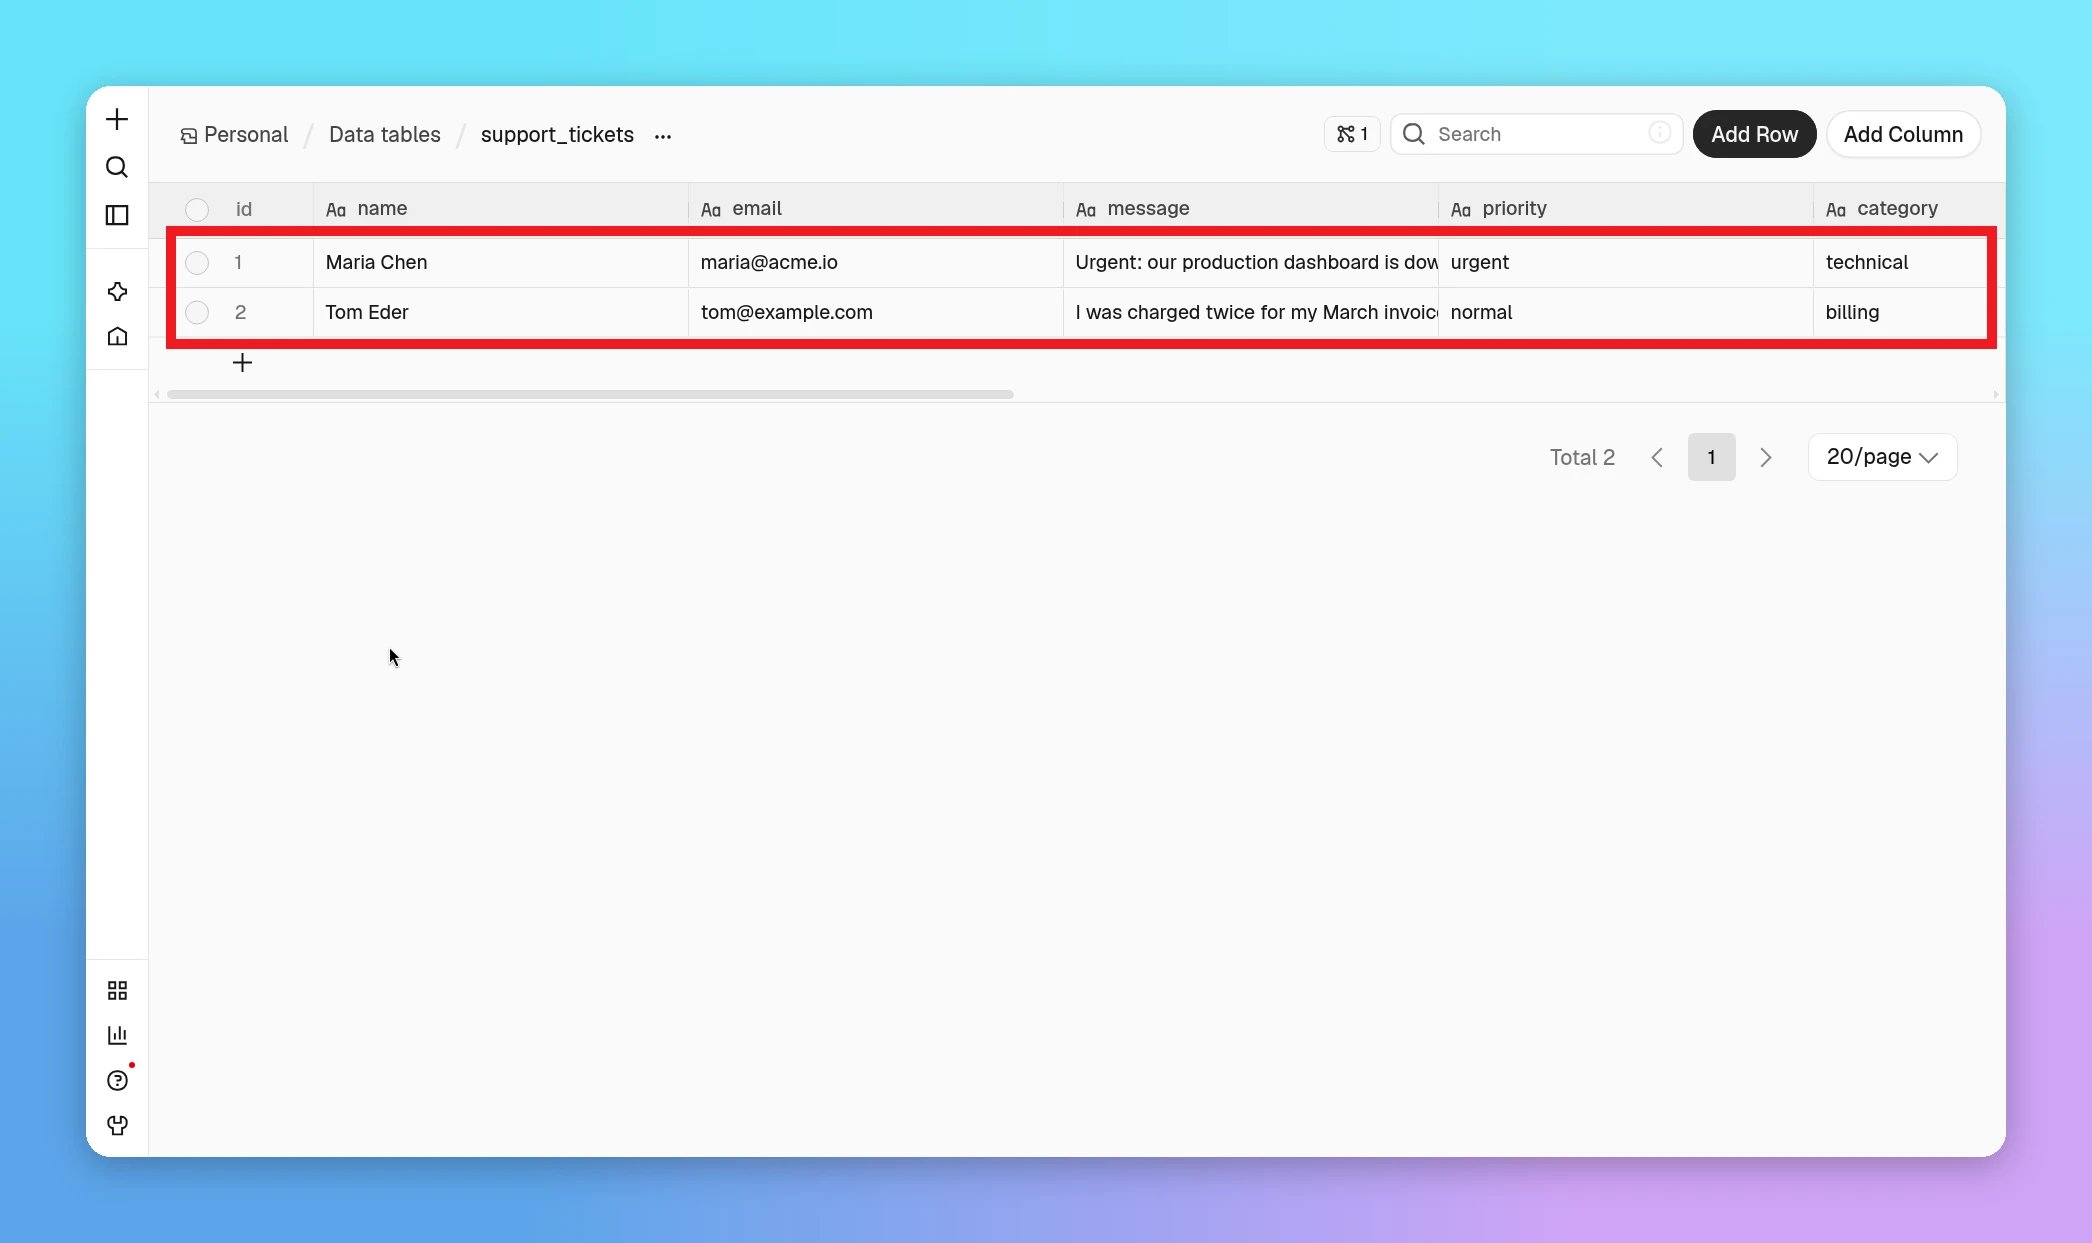
execute_workflow) and reads each result (get_workflow_execution).support_tickets data table to see the saved rows. The spam ticket isn’t saved.4
Ask the AI to improve it
Now make the workflow safer with a follow-up message:The AI changes only what’s needed (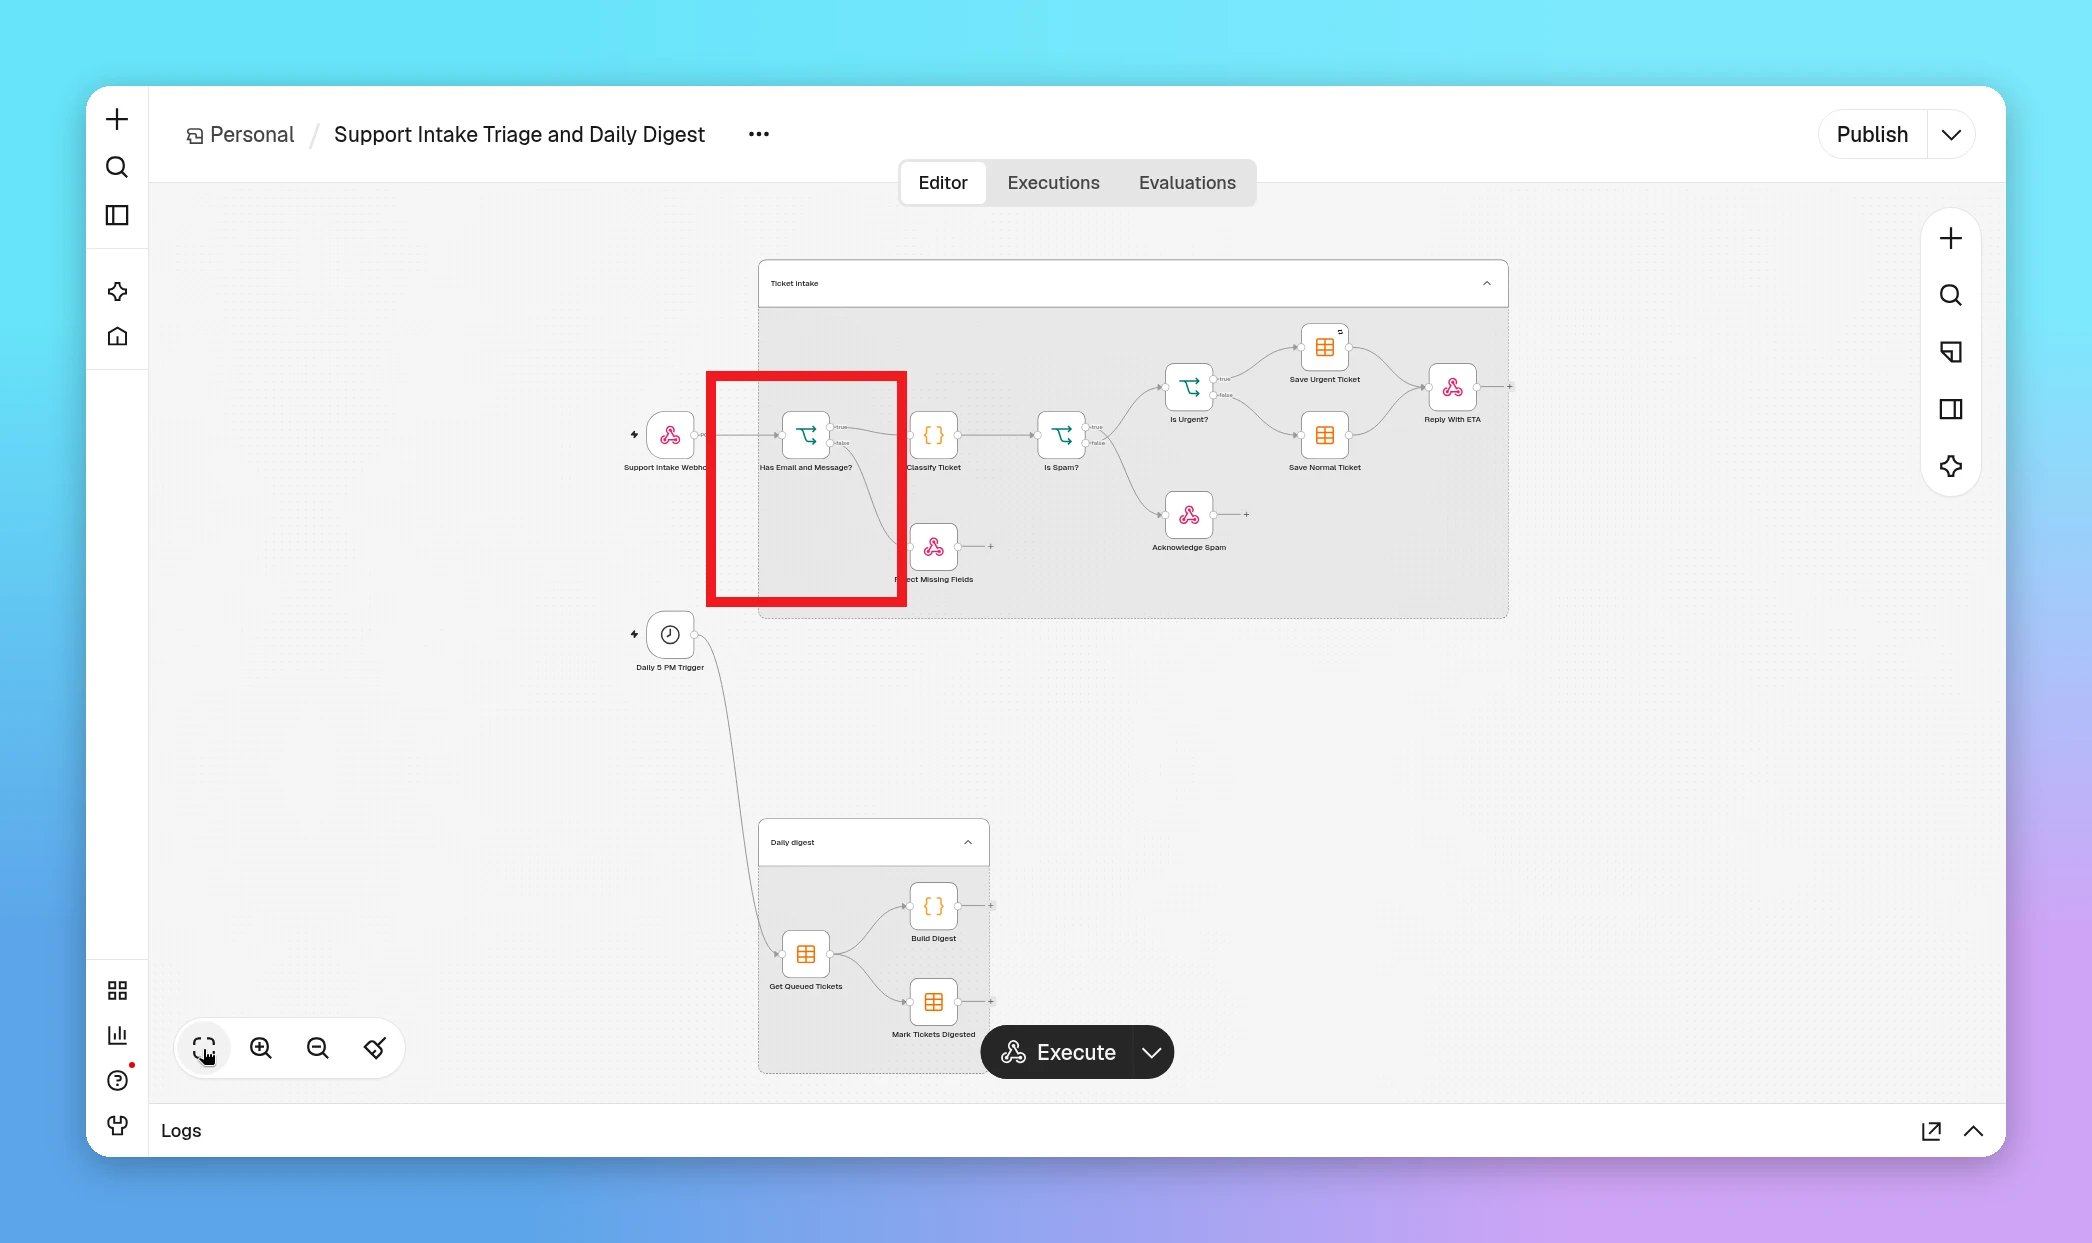
update_workflow). It adds a Valid Submission? check after the webhook that replies with 400 and {"ok":false,"error":"email and message are required"}, and turns on Retry On Fail (3 tries) for the node that saves urgent tickets.- “Add a separate branch for billing tickets.”
- “Also mark tickets that mention ‘cancel’ as urgent.”
5
Publish the workflow
A workflow only listens on its real (production) URL and runs on schedule after it’s published. Ask:The AI calls The response: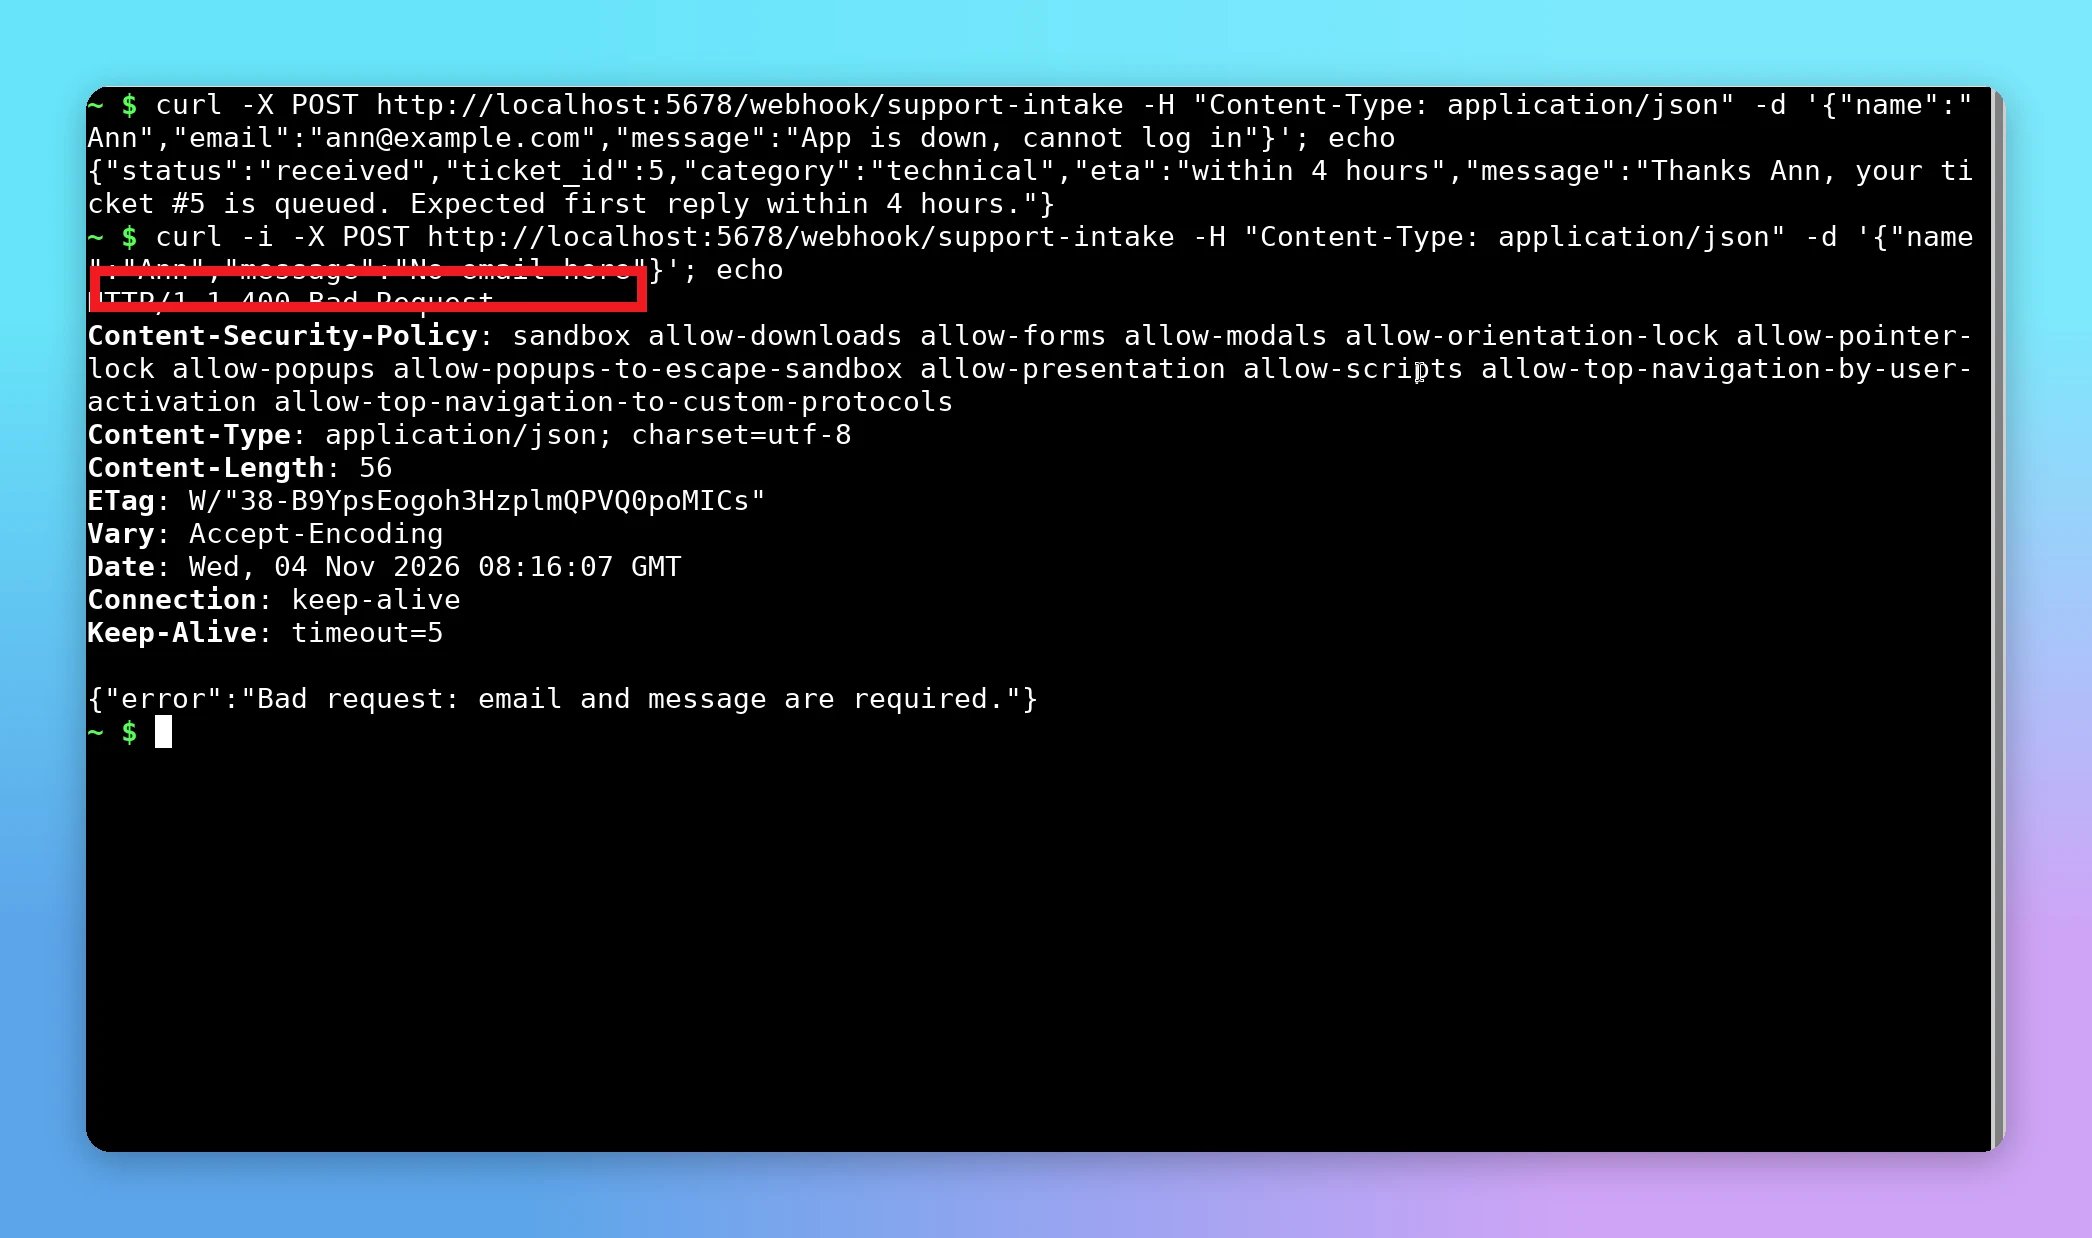
publish_workflow. The production URL looks like http://localhost:5678/webhook/support-intake.Point your form at this URL, or send a test request from a terminal:The 5 PM digest uses your n8n instance’s time zone. To change it, open the workflow’s Settings in n8n and set Timezone.
Run a workflow from chat
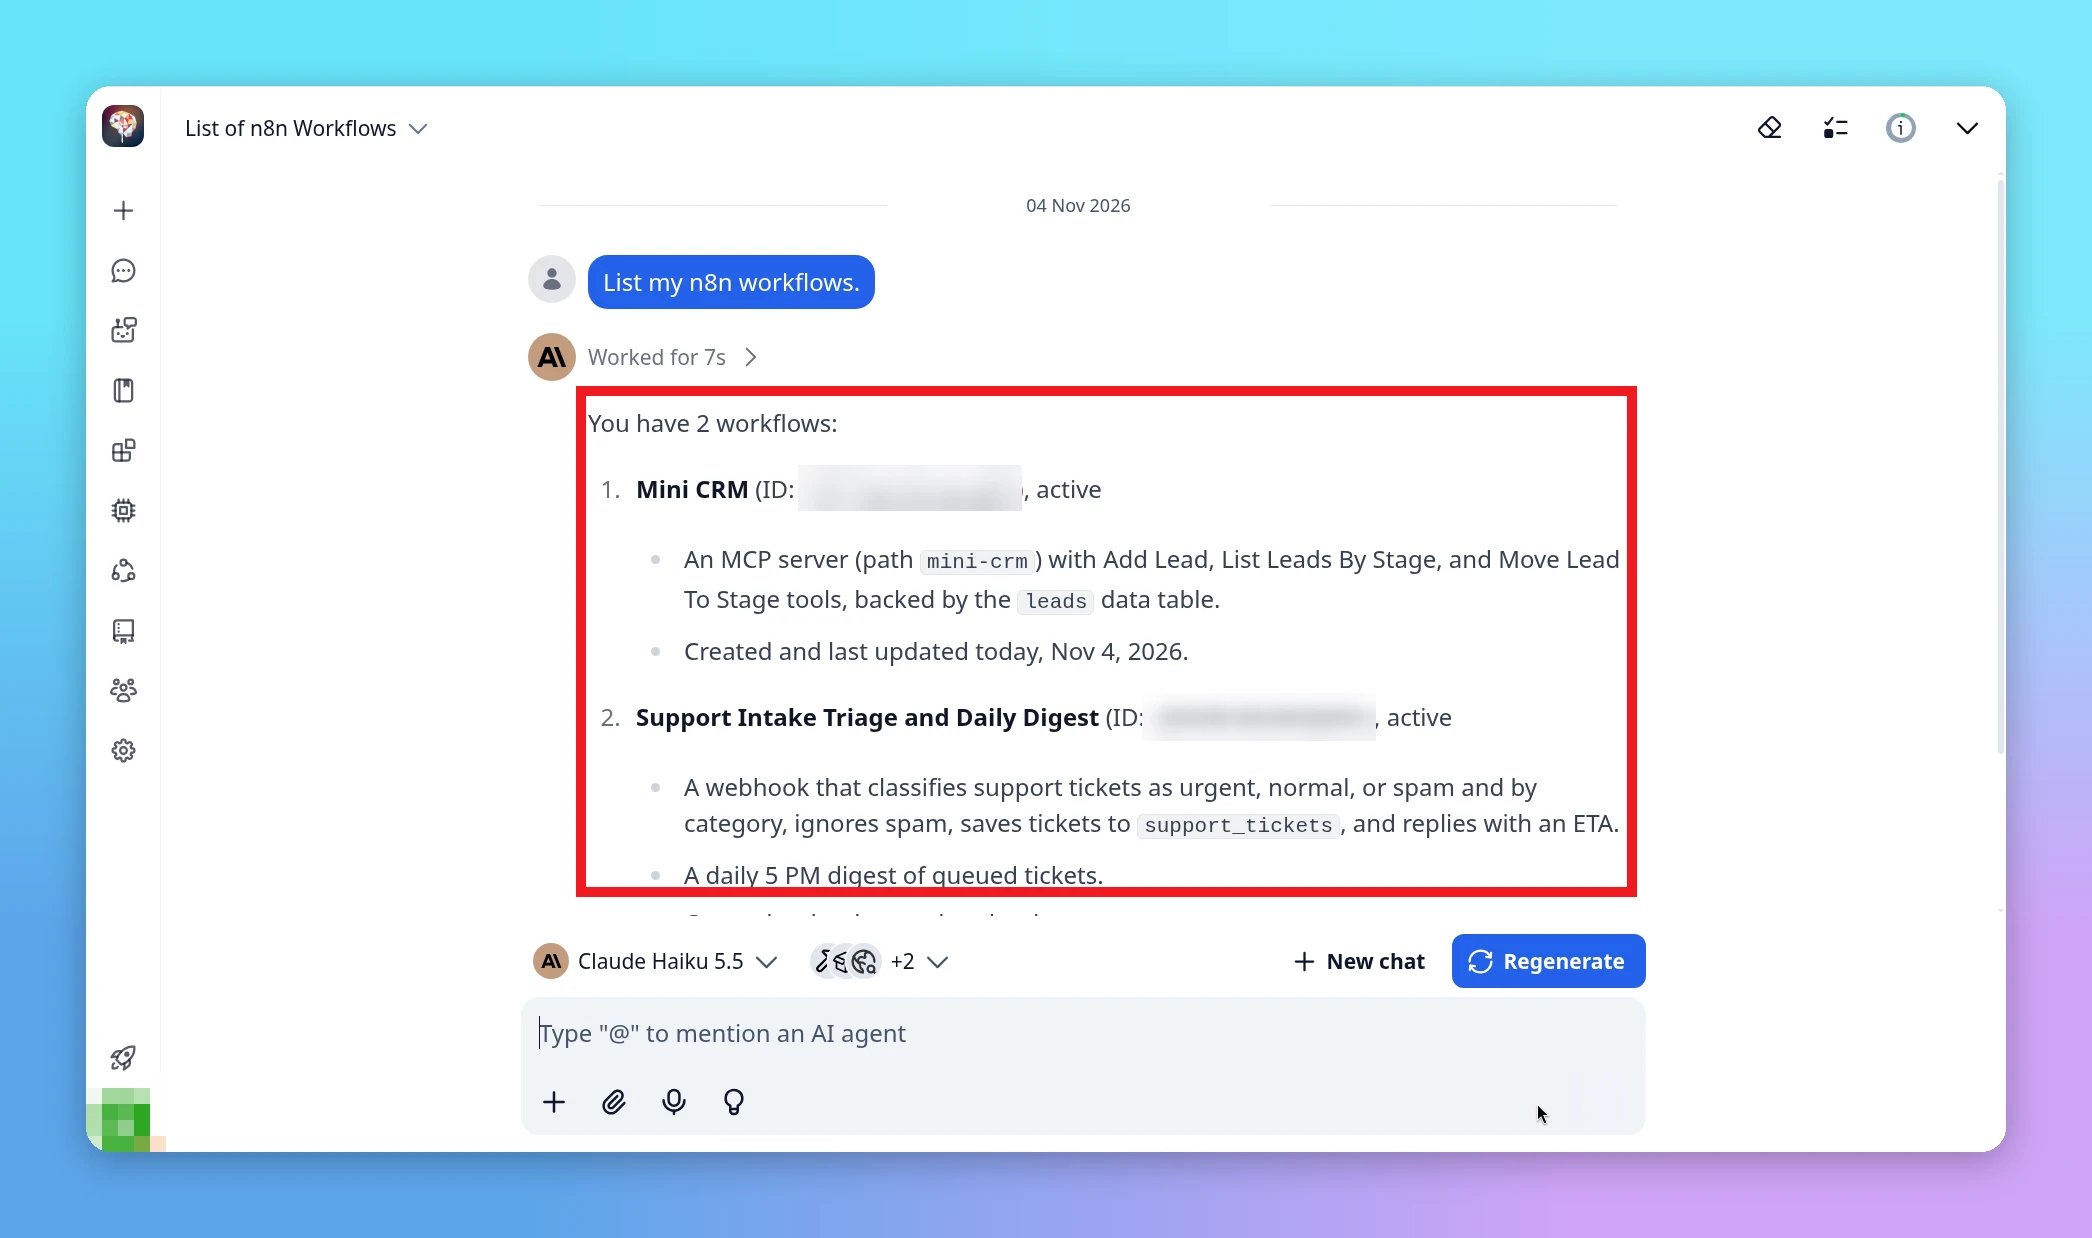
You can run any of your n8n workflows from a TypingMind chat, not only the ones the AI built. Ask in plain English, and the AI starts the workflow in n8n, waits for it to finish, and reads the result back into the chat. Example prompts:- The AI starts the workflow with
execute_workflow. The workflow runs on your n8n instance, not in TypingMind. - n8n returns an execution ID, and the AI reads the result with
get_workflow_execution. - The AI answers in the chat with what each step did. For past runs, it uses
search_workflow_executions.
- Existing workflows need Available in MCP. Open the workflow in n8n, click … → Settings, and turn on Available in MCP. Workflows the AI creates through MCP have it turned on already.
- Draft or published version. By default the AI runs the current draft (test mode). Say “run the published version” to run the version that’s live on your production URL. The workflow must be published first.
- Workflows that need input. For workflows that start with a Webhook, Chat, or Form trigger, give the input data in your message (for example, the ticket fields). If a workflow has more than one trigger, tell the AI which one to use.
- Runs are real. Every node really runs. Data gets written, and emails or messages get sent.
- No waiting steps. Workflows that pause for a person, such as multi-step forms or approval (Wait) steps, can’t be run from chat.
Part 3: Turn a workflow into AI tools (Mini CRM)
Part 2 lets the AI build workflows. You can also go the other way: build a workflow once, and let the AI use it as a set of tools. n8n’s MCP Server Trigger node turns a workflow into its own MCP server. In this example, the tools work on a small CRM stored in an n8n data table calledleads:
1
Build the Mini CRM workflow
You can build it in n8n by hand, or ask the AI with the n8n plugin turned on:The AI creates a workflow with an MCP Server Trigger and three Data table tools, publishes it, and gives you the URL. It looks like 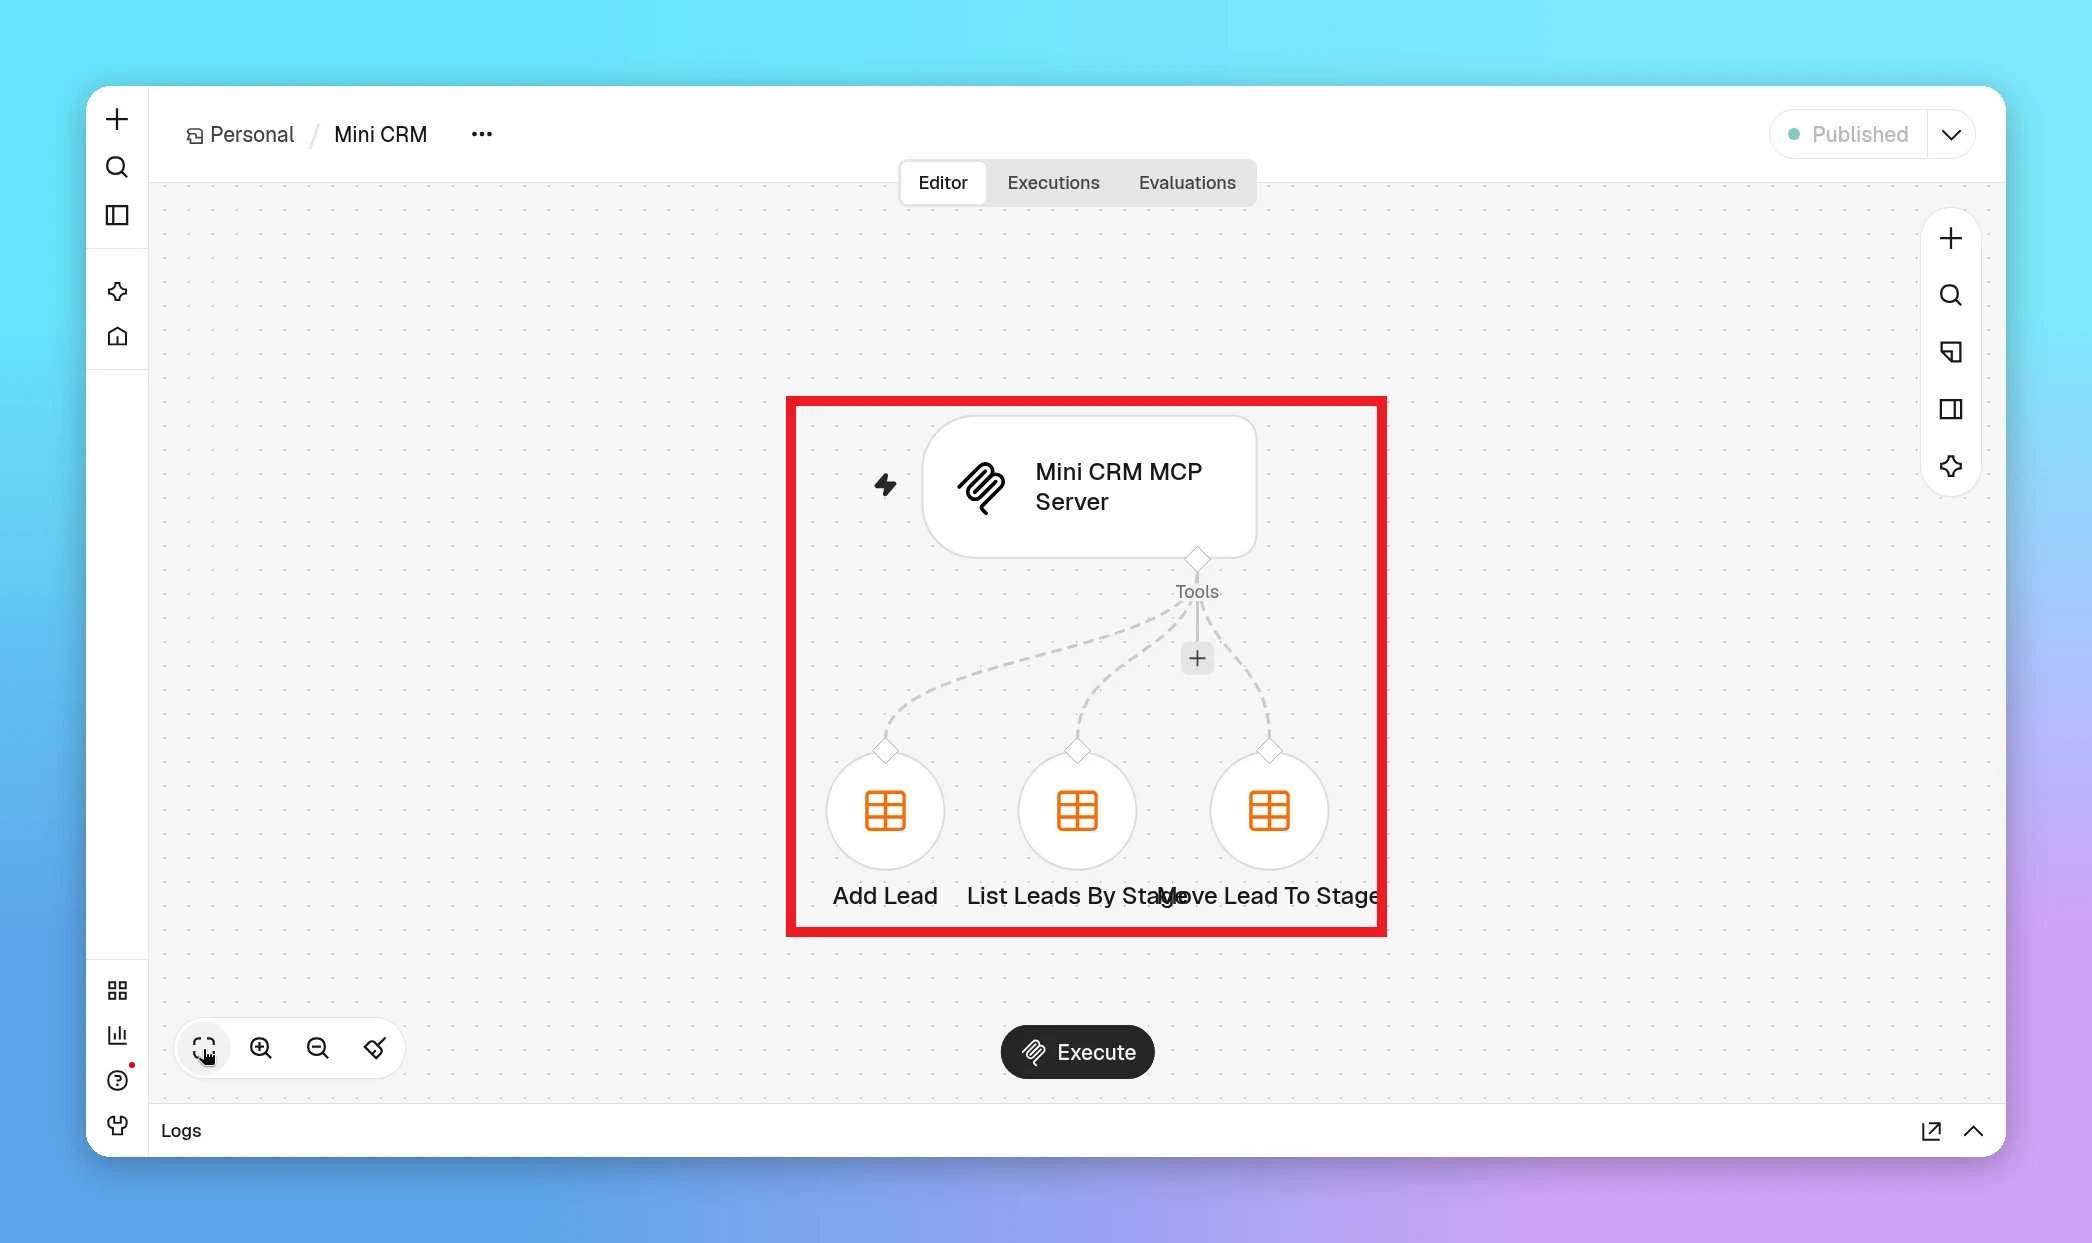
http://localhost:5678/mcp/mini-crm.2
Add it to TypingMind
Add a second MCP server the same way as in Part 1: Plugins → Store → MCPs → + Add MCP.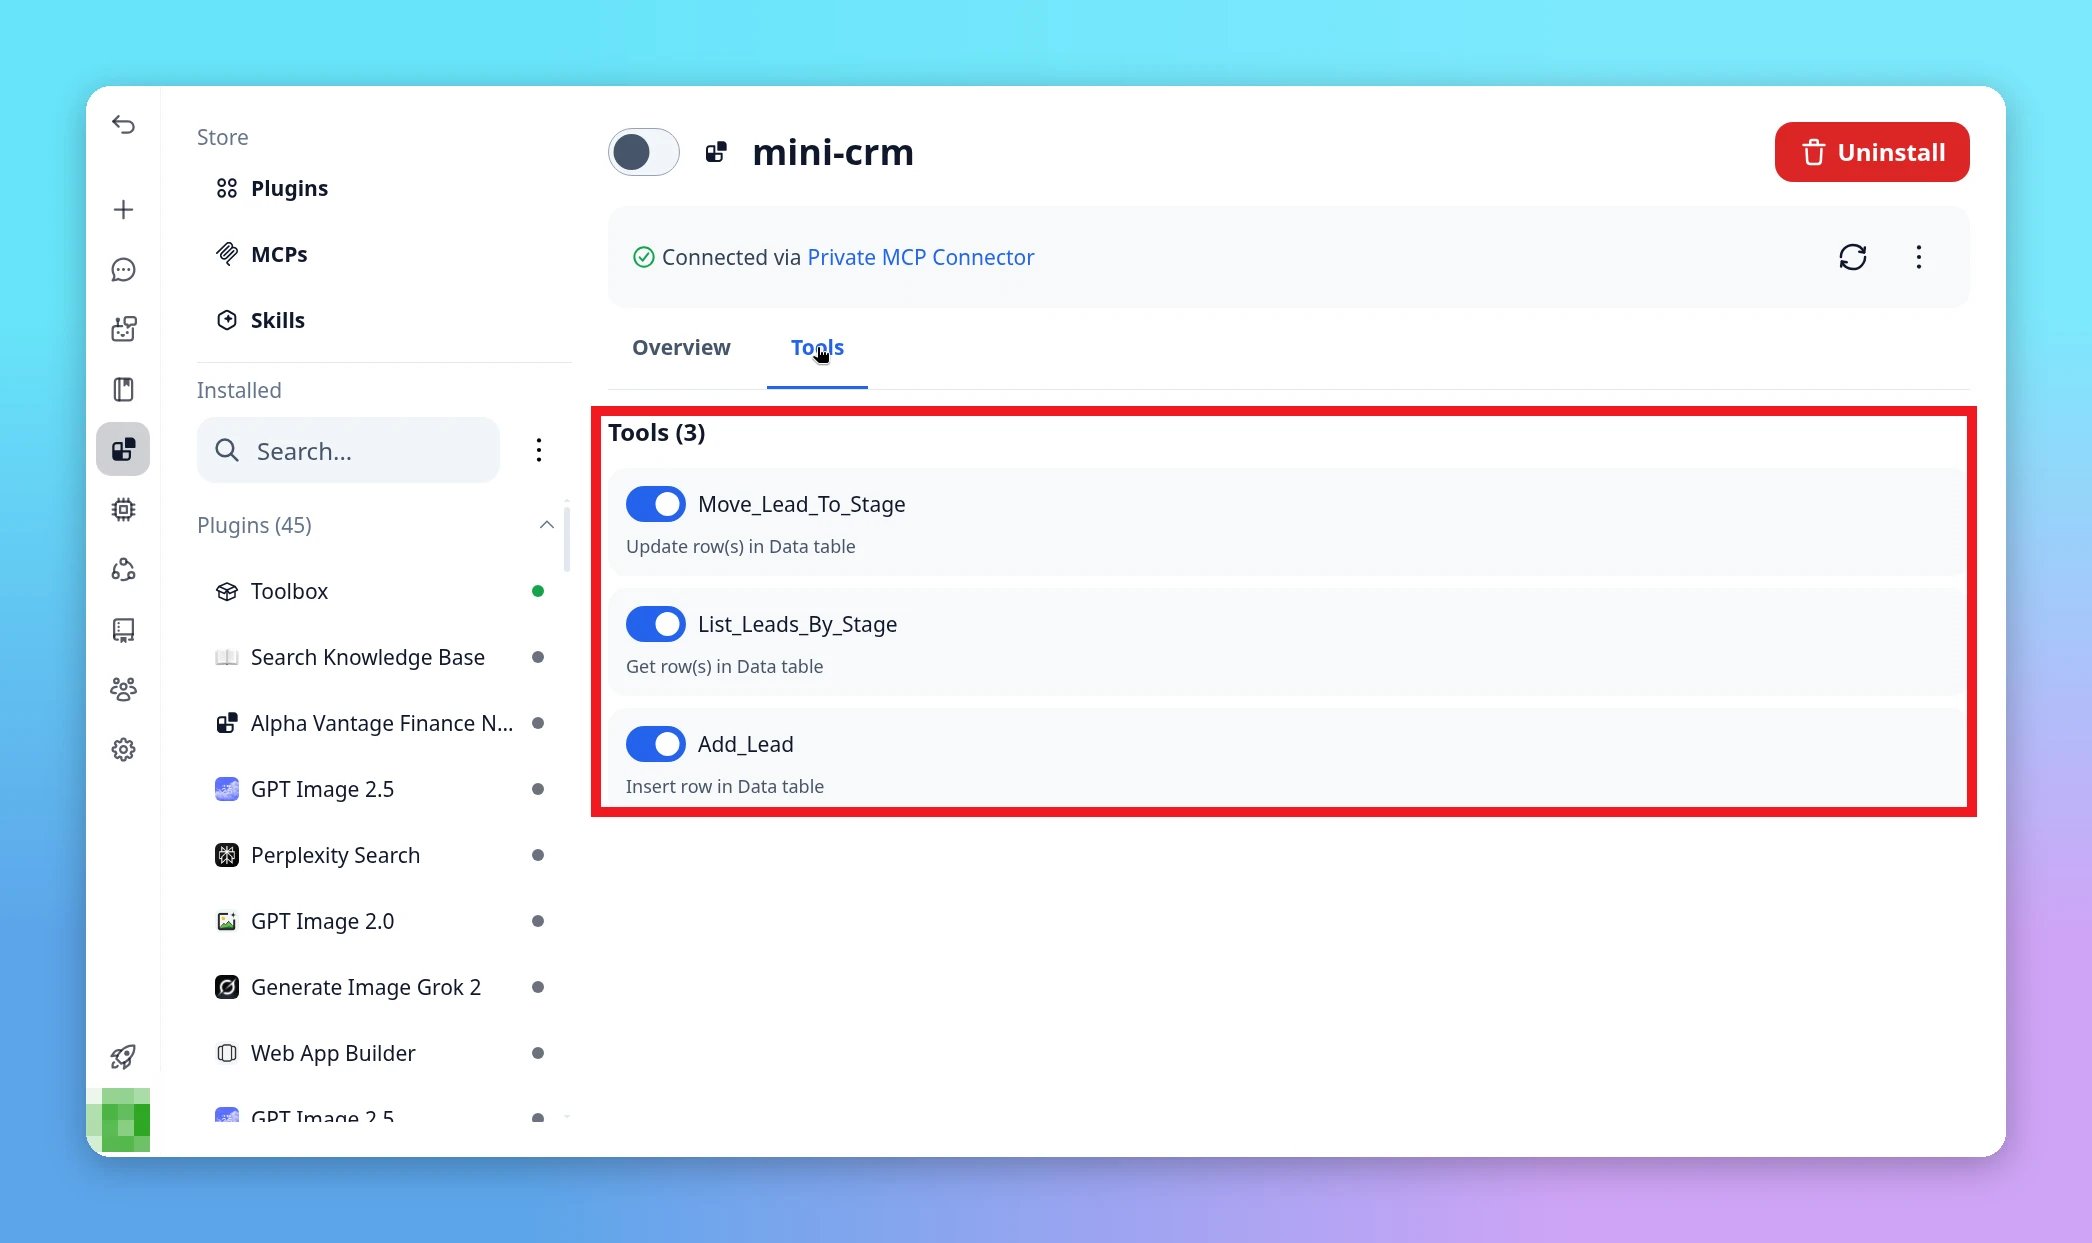
- Server URL:
http://localhost:5678/mcp/mini-crm(use the Production URL from the MCP Server Trigger node) - Connection name:
mini-crm
add_lead, find_leads_by_stage, and update_lead_stage.3
Talk to your CRM
Start a chat, turn on mini-crm in the plugin selector, and try: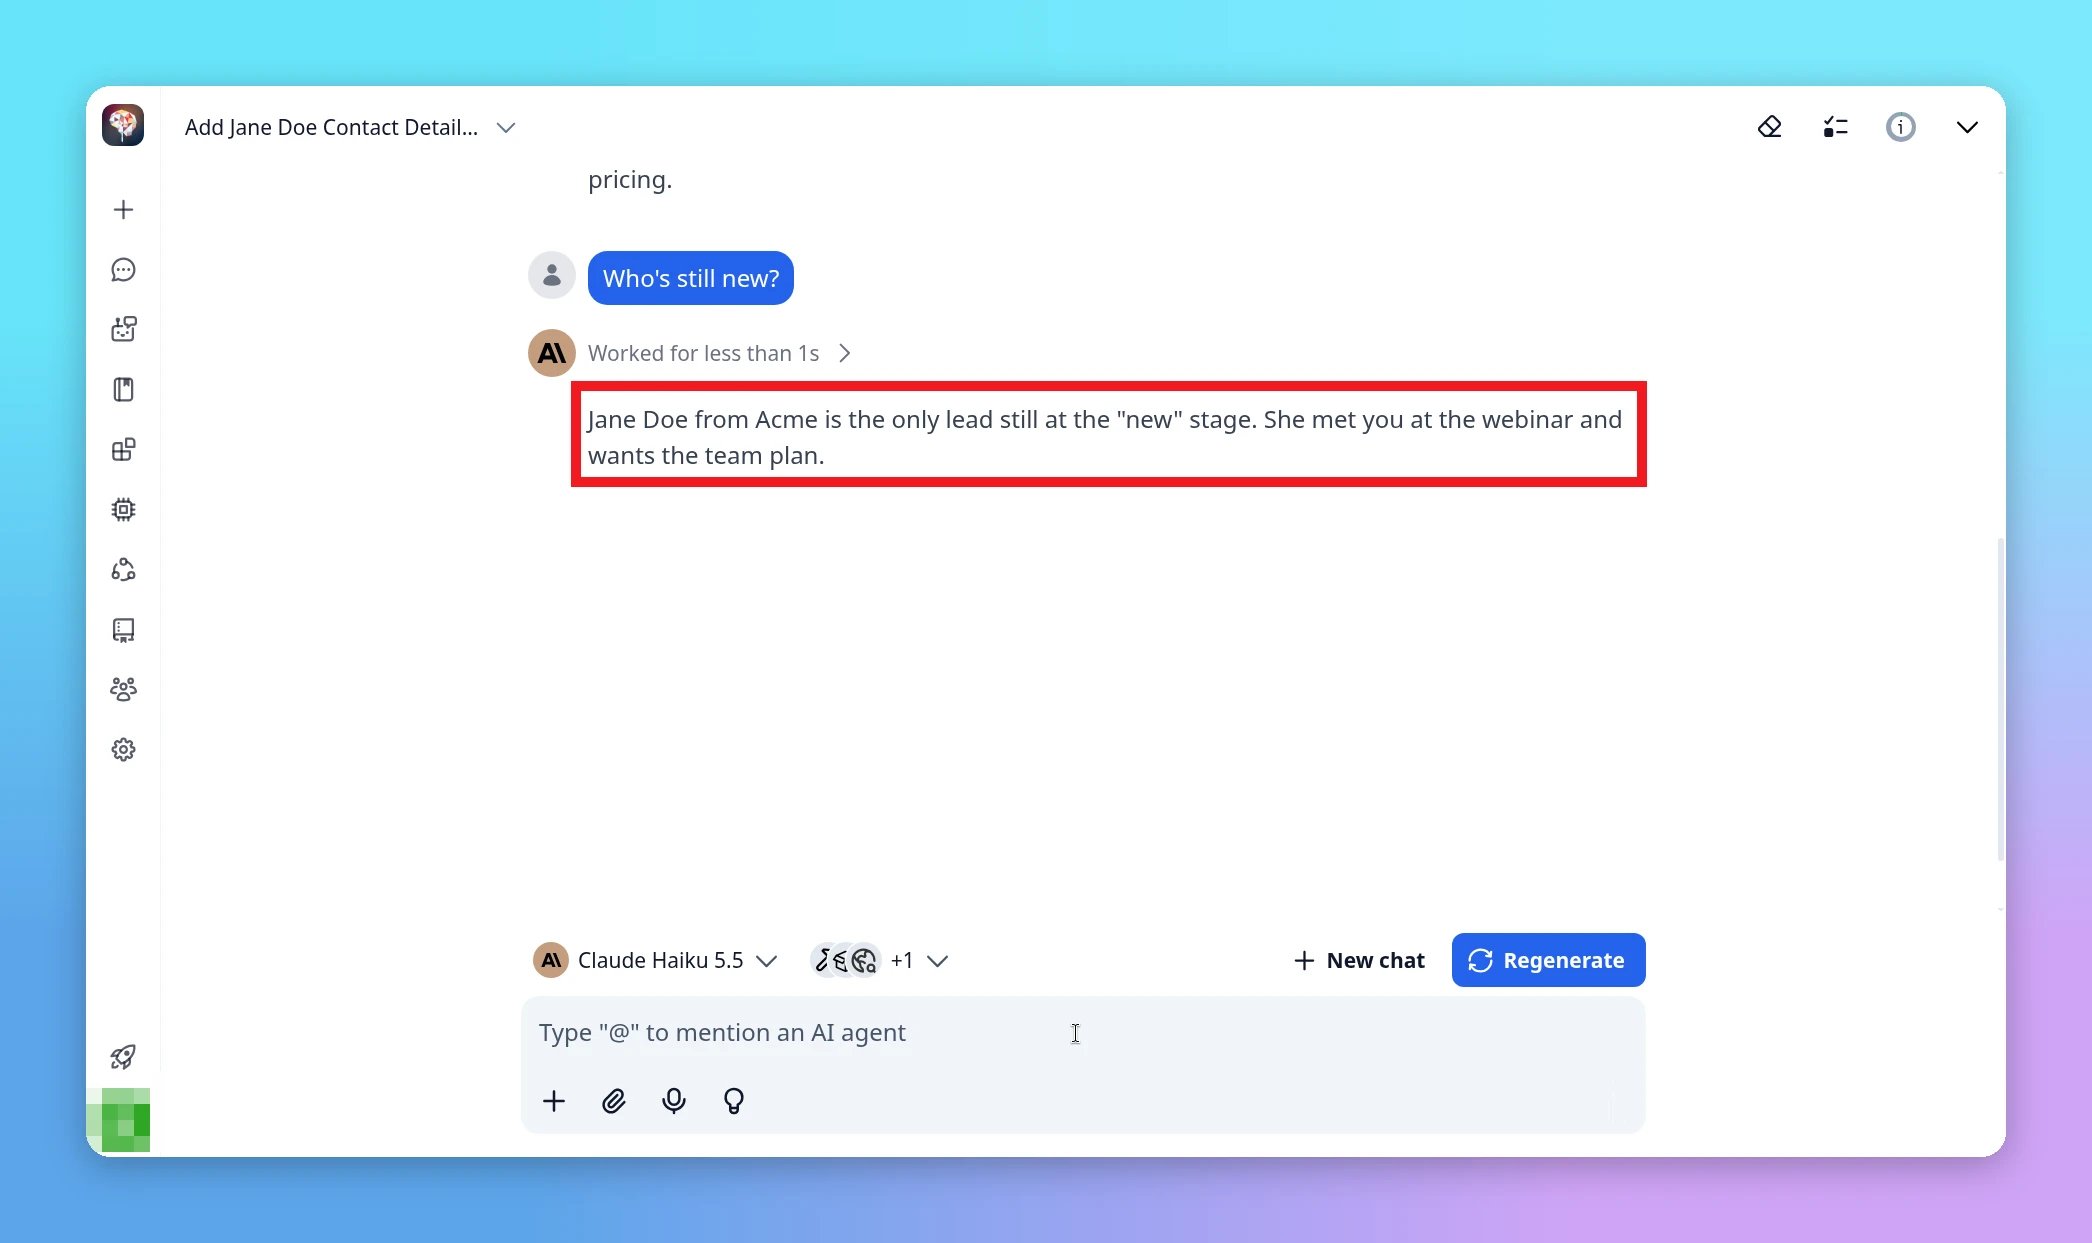
Other option: the third-party n8n-mcp server
n8n-mcp is a community project by czlonkowski, not made by n8n or TypingMind. It gives the AI detailed docs for every n8n node and workflow templates, and it can manage workflows through the n8n API. It’s a good choice if you already use it, or if your n8n version doesn’t have the built-in MCP server. To run it locally with the Private MCP Connector, go to Settings → Advanced Settings → Model Context Protocol → Edit Servers and add:Limits
- The AI can’t create credentials. It can’t add API keys or log in to apps (Gmail, Slack, OpenAI, and so on) for you. Add credentials in n8n yourself, then ask the AI to use them.
- AI nodes need an LLM credential. n8n’s AI Agent and LLM nodes need an API key saved in n8n. That’s why the example sorts tickets with keyword rules instead of an AI node.
- Test runs are real. When the AI tests a workflow, every node really runs. Data gets written, and messages get sent.
- No waiting steps in tests. The AI can’t test workflows that pause for a person, such as multi-step forms or approval steps.
- Only workflows available in MCP. The AI can’t see or run your existing workflows until you turn on Available in MCP for them.
- Building uses a lot of tokens. Expect several minutes and many tool calls for a build. Choose a model with good tool calling.
Security notes
- The n8n MCP access token gives the AI the same access as your n8n account. Don’t share it, and rotate it in Settings → Instance-level MCP if it leaks.
- Tools marked Destructive (for example
archive_workflowanddelete_data_table_column) can change or remove things. Turn off the ones you don’t need in the Tools tab. - Your AI model provider receives the workflow details and data that the AI reads, the same as any chat.
Troubleshooting
TypingMind can't connect to n8n
TypingMind can't connect to n8n
- Check that the Server URL ends in
/mcp-server/http. This isn’t the address in your browser’s address bar. - Check the header: name
Authorization, valueBearerfollowed by your token. - Make sure MCP status says Enabled in Settings → Instance-level MCP.
- For a
localhostURL, choose Private MCP Connector and make sure the connector is running. See Can’t connect to the MCP Connector? - For n8n Cloud or a public HTTPS URL, choose TypingMind Cloud. TypingMind Cloud can’t reach
localhost.
Cloud path: 401, Failed to fetch, or connection fails
Cloud path: 401, Failed to fetch, or connection fails
- 401 Unauthorized: the access token is wrong, was regenerated (the old one is revoked), or the header is missing the
Bearerprefix. Generate a new token in n8n (Settings → Instance-level MCP → Connect → API key), copy it once, and update Authorization in TypingMind toBearer <new token>. - Server URL: must be
https://…/mcp-server/http(https, and the path must end with/mcp-server/http). A bare n8n editor URL won’t work. - MCP access disabled: in n8n, open Settings → Instance-level MCP and make sure MCP status says Enabled.
The AI doesn't see my existing workflows
The AI doesn't see my existing workflows
Turn on Available in MCP for the workflow: open it in n8n, click … → Settings. You can also turn on Auto-expose new workflows in Settings → Instance-level MCP.
The webhook URL returns 404
The webhook URL returns 404
The production URL only works after the workflow is published. Ask the AI to publish it, or click Publish in n8n. While testing in the n8n editor, use the test URL (
/webhook-test/...) instead.The AI keeps adding node groups or mentions a canvas warning
The AI keeps adding node groups or mentions a canvas warning
n8n returns a canvas layout warning on every save. It’s harmless. Tell the AI to ignore it.
My chat is slow or expensive
My chat is slow or expensive
The full n8n plugin sends about 21,000 tokens of tool descriptions with every message. Turn off tools you don’t use in the Tools tab, turn the plugin off in chats that don’t need it, or use an MCP Server Trigger workflow like the Mini CRM for everyday tasks.
Can I run my workflows from TypingMind, or only build them?
Can I run my workflows from TypingMind, or only build them?
You can run them too. Ask the AI to run a workflow, with input data if it needs some, and it reads the result back into the chat. Existing workflows need Available in MCP turned on. See Run a workflow from chat.